
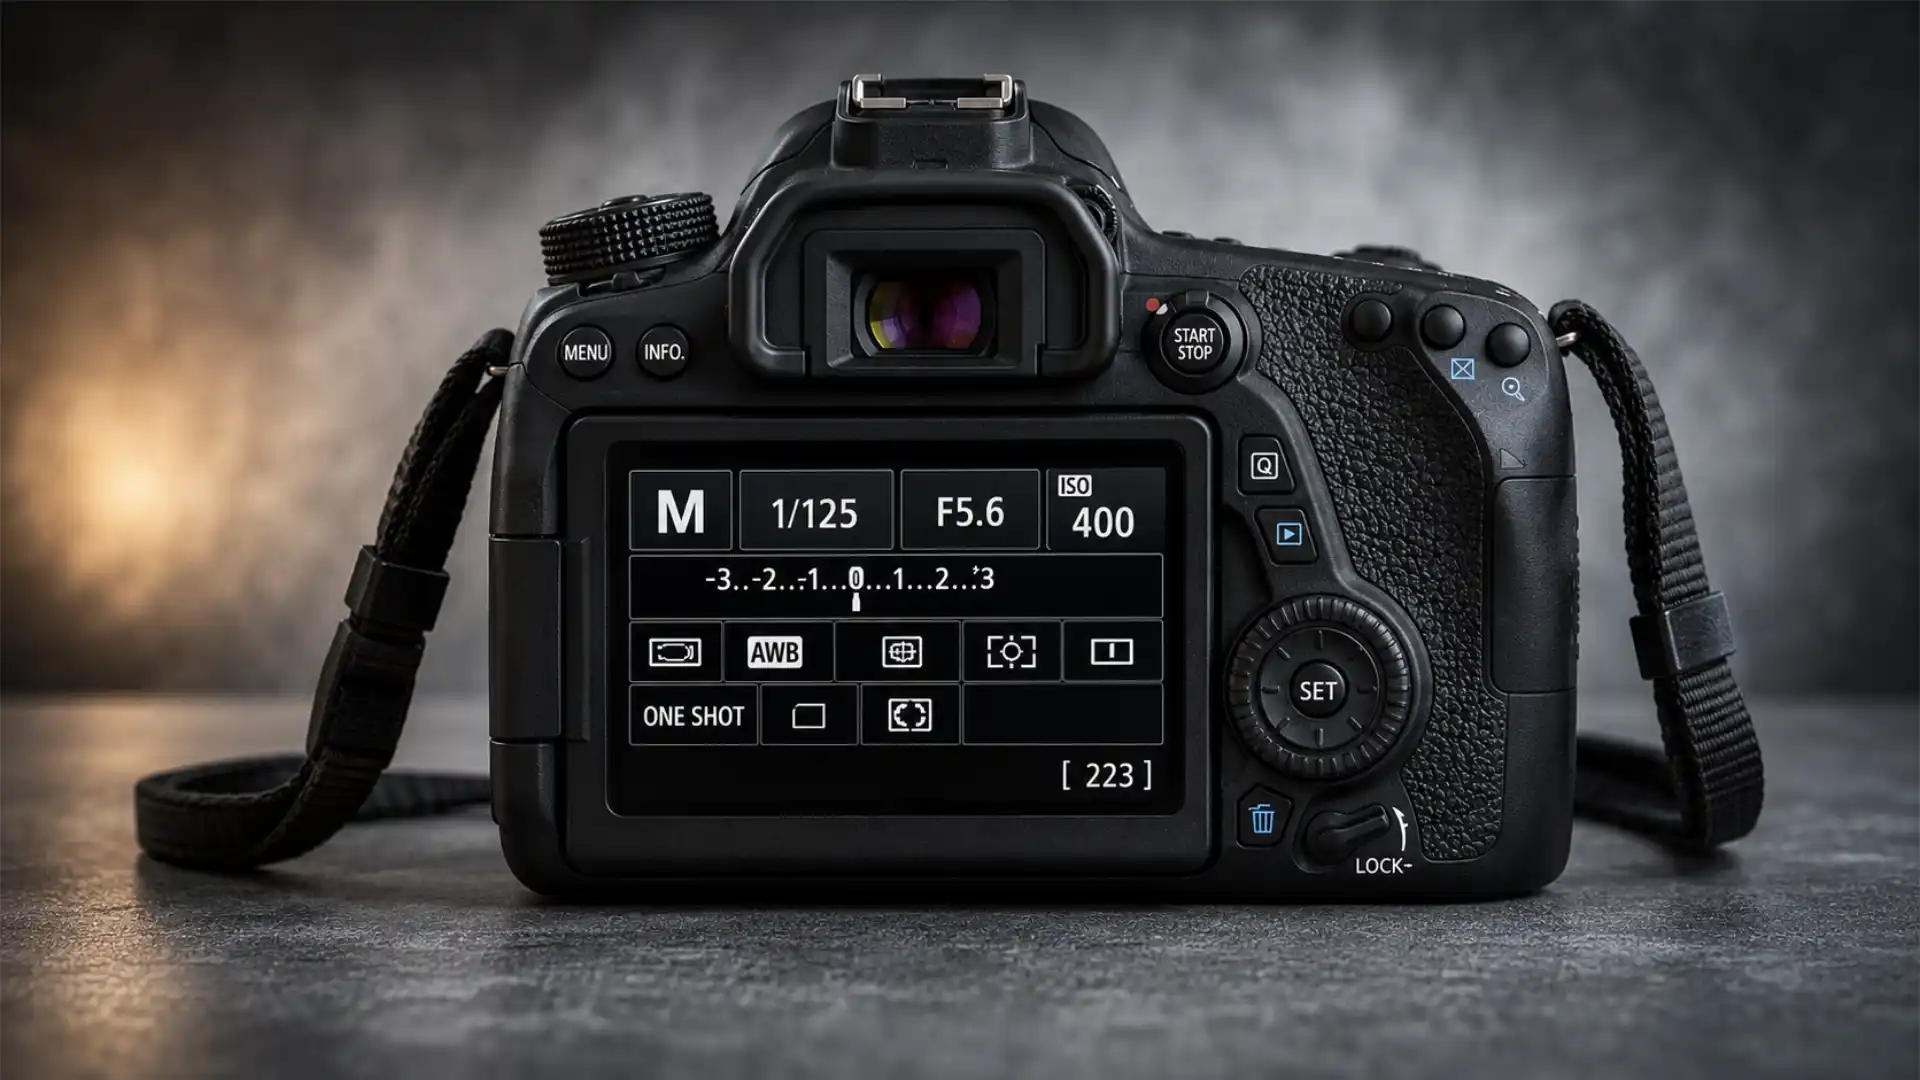
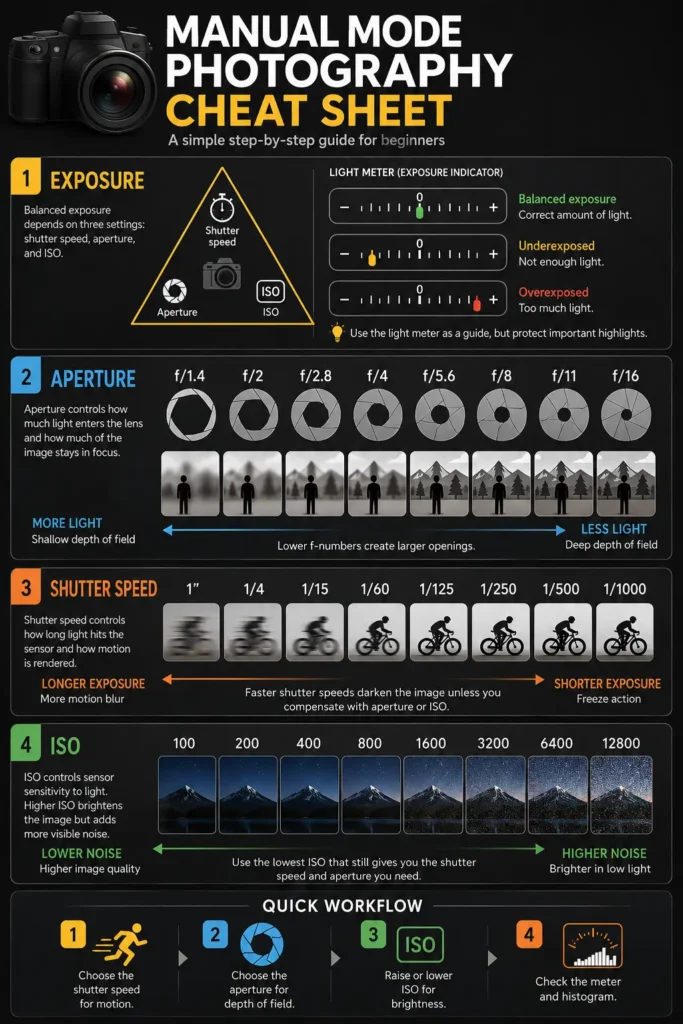
A beginner does not need a perfect theory of photography to use M mode. The useful starting point is much smaller: manual mode means the camera stops choosing the exposure settings for you. You choose aperture, shutter speed, and ISO. The camera still measures the light. It still focuses if autofocus is turned on. It still shows warnings, previews, meters, histograms, and blinking highlights if your model offers them. Manual mode is not a secret professional language. It is a repeatable way to decide brightness, blur, depth, and noise before the camera makes the file.
Table of Contents
M mode is a decision system, not a punishment
M mode scares beginners because it looks like a blank cockpit. The dial turns to M, the camera stops rescuing the exposure, and suddenly every bad photo feels like personal failure. That is the wrong frame. Manual exposure is not a test of talent. It is a way to lock decisions that automatic modes keep changing. Once the scene, subject, and light are understood, manual mode becomes calmer than Auto, Program, aperture priority, or shutter priority because it does not keep reinterpreting the same scene every time the frame changes.
The letter M usually means manual exposure. On most interchangeable-lens cameras, it gives the photographer direct control of aperture and shutter speed, while ISO may be manual or automatic depending on camera settings. Canon’s EOS R5 manual exposure support page describes setting shutter speed and aperture in Manual mode and checking the exposure level indicator, while Sony’s help system describes Manual Exposure as shooting with the desired exposure by adjusting both shutter speed and aperture. Nikon explains a related wrinkle: in Manual mode with Auto ISO turned on, aperture and shutter speed stay fixed while ISO changes as light changes.
That last detail matters. Many beginners think “M” always means nothing automatic is happening. It may not. Manual mode controls exposure decisions only to the extent that Auto ISO, auto white balance, autofocus, auto lighting corrections, flash automation, and in-camera processing are configured. A camera in M mode with Auto ISO enabled is not fully manual exposure in the strict sense; it is manual aperture and shutter speed with automatic sensitivity. That is not wrong. It is often useful. It just needs to be understood.
A better way to think about M mode is through responsibility. Auto mode asks the camera to decide the look. Aperture priority asks the camera to protect exposure while the photographer chooses depth of field. Shutter priority asks the camera to protect exposure while the photographer chooses motion rendering. Manual mode asks the photographer to choose the exposure recipe and lets the camera report whether that recipe is bright, dark, or close to the meter’s target.
Manual mode also makes patterns visible. If every indoor photo of a moving child is blurry at 1/30 second, the lesson is not abstract. The shutter speed was too slow for the subject. If every portrait has the ears sharp but the eyes soft at f/1.4, the aperture created too little depth of field or the focus point landed in the wrong place. If every evening image looks grainy at ISO 12800, the camera raised sensitivity because there was not enough light for the selected aperture and shutter speed. These lessons are harder to see when an automatic mode changes two settings in the background after every half-press.
The beginner’s goal is not to “master” manual mode as a badge. The goal is to know what each setting is doing before a bad image appears. M mode is useful when the light is steady, when consistency matters, when the camera meter is being fooled, or when the photographer wants a specific look that automation keeps fighting. It is less useful when the light changes quickly and the photographer has not yet built fast habits. That is not weakness; it is good judgment.
The easiest path into M mode is not to memorize a huge chart. It is to learn one decision at a time: choose the setting that protects the photo from failure, choose the setting that creates the look, then adjust the remaining setting or ISO until brightness lands where it belongs. That order turns manual mode from a puzzle into a checklist.
Exposure is brightness before it is style
Exposure is the brightness of the recorded image. A photo is underexposed when too little light is recorded for the intended result and overexposed when too much light is recorded. Adobe’s camera exposure guide defines exposure as how bright or dark a photo comes out and identifies shutter speed, aperture, and ISO as the three elements that affect it. Cambridge in Colour uses the same core trio, calling aperture, ISO, and shutter speed the settings that determine how light or dark the image appears.
Brightness sounds basic, but it is the part beginners often skip. They jump to background blur, “cinematic” settings, or sharp action before asking whether the image contains enough usable information. Manual mode punishes that shortcut. A beautifully chosen aperture does not save a file if the shutter speed is too slow and the subject moves. A fast shutter speed does not save a file if the ISO is forced so high that detail falls apart. Exposure is the floor beneath the creative choices.
The camera does not know what the photo should feel like. It measures reflected light and aims for a tonal target. This is why snow often turns gray in automatic exposure, black clothing may turn lighter than expected, and backlit faces become silhouettes. The meter sees brightness patterns, not meaning. It does not know that the face matters more than the sky, that the window is allowed to blow out, or that the dark concert stage should remain dark.
Manual mode puts those decisions back in human hands. It also separates the idea of “correct” from the idea of “wanted.” A technically centered meter reading is not always the right exposure. A moody portrait may need to be darker than the meter suggests. A white wedding dress in shade may need more exposure than the meter suggests. A night street scene should not be dragged up to daylight brightness just because the meter wants middle tones. The right exposure is the exposure that preserves the parts of the image you care about and supports the mood you intend.
Beginners should still use the meter. Ignoring it is like driving without looking at the road. The meter is a starting point, not a verdict. Put the exposure indicator near zero for a normal scene, take a test shot, check the image and histogram, then decide whether the result serves the subject. The adjustment after the test shot is where manual mode becomes practical.
Exposure also has a physical side. Aperture and shutter speed control light before the sensor records the image. ISO changes how the signal is handled or amplified after capture, depending on the sensor and camera processing. For a beginner, the working rule is enough: aperture and shutter speed change both brightness and the look of the image, while ISO changes brightness and image quality more than composition. B&H’s exposure guide makes the same distinction, describing aperture and shutter speed as exposure controls that also affect artistic qualities, while ISO alters brightness and image quality rather than motion or depth of field.
This is why the order of decisions matters. If movement is the danger, choose shutter speed first. If depth of field is the look, choose aperture first. If light is scarce after those choices, raise ISO only as much as needed. That order avoids the beginner habit of spinning all three controls randomly.
Aperture is the opening and the shape of depth
Aperture is the adjustable opening inside the lens. It is written as an f-number: f/1.8, f/2.8, f/4, f/5.6, f/8, f/11, and so on. The beginner trap is that the numbering feels backwards. A smaller f-number means a wider opening and more light. A larger f-number means a narrower opening and less light. Cambridge in Colour explains that aperture controls the area over which light passes through the lens, and that the opening grows as the f-stop number decreases. B&H’s aperture guide also notes that larger apertures let more light into the camera and allow faster shutter speeds in the same light.
Aperture does two jobs. The first is exposure. Open the aperture from f/5.6 to f/4, and more light reaches the sensor. Close it from f/4 to f/5.6, and less light reaches the sensor. The second job is depth of field, which is the zone that appears acceptably sharp in front of and behind the focused distance. A wide aperture such as f/1.8 creates a shallow zone of focus. A narrow aperture such as f/11 creates a deeper zone of focus, provided the lens and focus distance allow it.
Portrait photographers use wide apertures because they separate the subject from the background. The face looks sharp, the background softens, and distractions lose force. Product photographers may also use a moderately wide aperture to isolate a small object. Scenery, architecture, group photos, and documentary work often need narrower apertures because more of the frame must remain sharp. Canon’s depth-of-field guide gives a practical range: apertures around f/2.8 to f/8 are often used for portraits with softer backgrounds, while f/11 to f/22 may be used for scenes where foreground and distance both need sharpness.
Beginners often think aperture alone controls background blur. It is only part of the result. Subject distance, background distance, focal length, sensor size, and viewing size matter too. A portrait at f/4 with a longer lens and a distant background may look blurrier than a phone-style wide-angle shot at a lower f-number. A close-up flower at f/8 may still have very shallow depth because the camera is so close to the subject. The f-number does not work in isolation.
Aperture also affects sharpness in ways beginners discover later. Very wide apertures can be softer on some lenses, especially near the edges. Very narrow apertures can reduce fine detail because of diffraction. Many lenses are sharpest somewhere in the middle, often around f/5.6 to f/8, though lens design matters. Beginners should not obsess over this early. A sharp subject at f/2.8 beats a missed moment at a theoretically sharper f/8. The first job is to pick an aperture that fits the image.
A usable beginner rule is direct. Choose a low f-number when you want blur behind one subject. Choose a higher f-number when several distances must stay sharp. For one person, start around f/2.8 to f/4 if the lens allows it. For two or three people, use f/4 to f/5.6. For a large group, use f/5.6 to f/8 and focus carefully. For scenery with foreground detail, try f/8 to f/11. Then adjust shutter speed and ISO to make the exposure work.
The manual-mode mistake is choosing aperture because the number sounds “professional.” f/1.4 looks impressive until one eye is sharp and the other is not. f/16 sounds safe until the shutter speed falls too low for handholding. Aperture is not a status setting. It is a trade-off between light and depth.
Shutter speed decides whether movement freezes or smears
Shutter speed is the time the camera records light. It is written as fractions of a second, whole seconds, or longer exposures: 1/1000, 1/500, 1/250, 1/60, 1/15, 1 second, 10 seconds, and beyond. Faster shutter speeds record less time and freeze motion more easily. Slower shutter speeds record more time and show motion as blur. Cambridge in Colour describes shutter speed as the duration of exposure, while B&H’s shutter-speed guide explains that shutter speed must be balanced with aperture and ISO and that it controls the ability to freeze or blur action.
Shutter speed causes two different kinds of blur. The first is subject blur. If the subject moves while the exposure is happening, the subject smears across the frame. A running dog at 1/30 second will likely blur even if the camera is on a tripod. The second is camera shake. If the photographer moves the camera during exposure, the entire image may look soft or streaked. A still building at 1/15 second can blur if the hands move.
Beginners often confuse these. Image stabilization helps with camera shake. It does not freeze a moving child, cyclist, bird, dancer, or dog. A stabilized lens may allow a sharp photo of a statue at 1/15 second, but it cannot stop a person’s hand from blurring at the same speed. The subject decides one part of the shutter requirement; the photographer and lens decide another.
A common handholding rule says the shutter speed should be at least the reciprocal of the focal length. A 50mm lens would suggest around 1/50 second or faster; a 200mm lens would suggest around 1/200 second or faster. B&H describes this traditional rule while noting that modern stabilization changes the practical limit for newer systems. The rule is still useful because it teaches a beginner that longer lenses magnify shake.
Subject speed needs separate judgment. A person posing can be sharp at 1/125 second. A walking person may need 1/250 second. Children playing indoors often need 1/250 to 1/500 second. Sports may need 1/1000 second or faster. Birds in flight, splashing water, and fast pets may require higher speeds. These are not fixed laws. Direction of movement, distance, lens length, and image size all matter. A runner moving across the frame needs a faster shutter speed than the same runner moving toward the camera.
Slow shutter speed is not always a mistake. Waterfalls, traffic trails, clouds, panning shots, and night scenes use blur as part of the photograph. In that case, the camera usually needs a tripod or stable surface. The photographer decides what should blur and what should remain sharp. A long exposure of moving water looks intentional when rocks, trees, and buildings stay crisp. It looks accidental when the whole frame shakes.
Manual mode makes shutter decisions clean. If motion must freeze, set the shutter speed first. Do not let brightness tempt you below the safe speed. Open the aperture or raise ISO instead. If motion should blur, set the slow speed first, stabilize the camera, and then close the aperture or lower ISO to avoid overexposure. Shutter speed protects the photo from the kind of blur you do not want. That is its beginner-friendly purpose.
ISO is brightness gain with a noise bill
ISO is the setting beginners reach for when the image is too dark and they do not want to change aperture or shutter speed. That instinct is not wrong. ISO brightens the image, or in many digital workflows, raises the recorded signal and processing brightness associated with the sensor’s response. The practical effect is easy to see: ISO 800 produces a brighter exposure than ISO 100 when aperture and shutter speed stay the same. Adobe defines ISO as the camera sensor’s sensitivity to light in beginner-facing terms, and B&H describes ISO as a setting that must be balanced with shutter speed and aperture, especially when light is limited.
ISO has a cost. As ISO rises, noise becomes more visible, color may weaken, and fine detail may suffer. B&H’s ISO guide notes that higher ISO values increase visible digital noise. Cambridge in Colour also states that lower ISO is usually desirable because higher ISO dramatically increases image noise, while also acknowledging that higher ISO becomes necessary when the desired aperture and shutter speed are not otherwise possible.
The beginner mistake is treating ISO as either forbidden or meaningless. Some photographers tell new users to keep ISO at 100 at all times. That advice ruins more photos than it saves. A clean but blurry photo is usually worse than a noisy but sharp photo. If the subject is moving indoors and f/2.8 at 1/250 second still leaves the frame dark, ISO must rise. Noise is visible; motion blur is often fatal.
The opposite mistake is letting ISO climb without noticing. A camera set to Auto ISO may push to ISO 6400, 12800, or higher in dim light. On a modern full-frame camera, that may be acceptable for web use or documentary moments. On a small-sensor compact or older entry camera, the result may look rough. The right ISO depends on the camera, the light, the subject, and the output. A family memory at ISO 12800 may be worth the grain. A product photo for a shop may need lower ISO, added light, or a tripod.
Manual mode with manual ISO teaches exposure most clearly because nothing changes unless the photographer changes it. Manual mode with Auto ISO teaches a different skill: choosing aperture and shutter speed while the camera floats sensitivity to maintain brightness. Nikon’s Auto ISO explanation makes this behavior explicit in Manual mode: aperture and shutter speed are fixed by the user, while ISO Auto changes ISO as light levels change.
Auto ISO is especially useful for action, street, events, wildlife, and children. The photographer can set f/2.8 for subject separation, 1/500 second to freeze movement, and let ISO move as the subject passes through shade and sun. The risk is that ISO may climb beyond the quality level the photographer accepts. Most cameras allow an Auto ISO maximum. Beginners should set that maximum deliberately, not leave it unknown.
A good learning exercise is to photograph the same scene at ISO 100, 400, 1600, 6400, and the highest setting the camera allows. View the files on a computer, not only the rear screen. Decide where the noise becomes unacceptable for personal use. Every camera has a personal ISO comfort zone, and beginners learn faster when they test it directly instead of trusting a universal number.
Stops are the shared language of the three controls
A “stop” is a doubling or halving of light. It is the shared unit that lets aperture, shutter speed, and ISO trade places. B&H defines a stop as a term representing the doubling of light-gathering capability and uses the example of moving from 1/250 second to 1/500 second as a one-stop decrease in exposure. Cambridge in Colour’s exposure tutorial also shows shutter speed and ISO correlating closely with changes in exposure and lists aperture values that pair with shutter speeds for equivalent exposure.
Stops are less scary when tied to real movement. If the photo is too dark by one stop, you need twice as much light or twice as much brightness. You could slow the shutter from 1/250 to 1/125. You could open the aperture from f/5.6 to f/4. You could raise ISO from 400 to 800. Each change brightens by about one stop, but each changes the image differently. Slowing shutter risks blur. Opening aperture reduces depth of field. Raising ISO adds noise.
The same logic works in reverse. If the photo is too bright by one stop, reduce light or brightness by half. Use 1/500 instead of 1/250. Use f/8 instead of f/5.6. Use ISO 200 instead of ISO 400. Manual mode becomes faster when stops feel like equivalent coins with different side effects.
Aperture values are the least intuitive because the sequence is mathematical. The common full-stop sequence is f/1.4, f/2, f/2.8, f/4, f/5.6, f/8, f/11, f/16, f/22. Moving from f/2.8 to f/4 loses one stop of light. Moving from f/8 to f/5.6 gains one stop. Many cameras use third-stop increments between these values, which is why beginners see numbers like f/3.2, f/6.3, or f/7.1.
Shutter speed is more direct. 1/1000 to 1/500 gains one stop because the shutter stays open twice as long. 1/250 to 1/500 loses one stop because the exposure time is halved. ISO is also direct for common values: ISO 100 to 200 gains one stop, 200 to 400 gains another, and 400 to 800 gains another.
Stops matter because they remove panic. Imagine a beginner photographing a child indoors at f/4, 1/60 second, ISO 800. The brightness is fine, but the child is blurry. The fix is to raise shutter speed to 1/250 second. That is two stops faster than 1/60, so the image becomes two stops darker. To keep the same exposure, the photographer might open aperture two stops from f/4 to f/2, or raise ISO two stops from 800 to 3200, or split the difference: f/2.8 and ISO 1600. That is manual mode in practice.
The goal is not to do math aloud during every photo. The goal is to recognize trade-offs. Every exposure correction asks the same question: which side effect is safest for this image? For action, noise may be safer than blur. For a group photo, higher ISO may be safer than opening the aperture too wide. For a tripod scene, slower shutter speed may be safer than higher ISO. The setting does not exist alone; it carries a consequence.
The exposure meter is a guide, not a judge
Inside the viewfinder or on the rear screen, manual mode usually shows an exposure scale. It may run from minus to plus with zero in the middle. When the marker sits near zero, the camera meter thinks the selected settings match its target. When the marker moves toward minus, the camera expects a darker result. Toward plus, it expects a brighter result. Canon’s EOS R5 support page tells users to check the exposure level indicator when setting shutter speed and aperture in manual exposure.
The meter is useful, but it is not truth. Cambridge in Colour’s metering guide explains the core problem: in-camera meters measure reflected light and therefore estimate how much light is actually hitting the subject. It also notes that camera meters are standardized around a middle-gray target, and subjects lighter or darker than that can lead the meter toward wrong exposure.
This explains many beginner frustrations. A snowy scene is bright because snow reflects a lot of light. The camera meter may try to pull it down toward gray, making the photo underexposed. A black dog on a dark sofa reflects little light. The meter may try to brighten it toward gray, making the photo overexposed. A person standing before a bright window may become too dark because the meter gives too much weight to the window.
Manual mode gives a clean fix because the exposure can be locked where the photographer wants it. In a snowy scene, set the meter a little brighter than zero and check the histogram to avoid clipped highlights. For a dark stage, set the exposure darker than zero if that preserves the atmosphere and prevents faces from blowing out. For backlit portraits, expose for the face, not the bright background, unless the silhouette is intentional.
Metering mode changes how the camera reads the scene. Evaluative, matrix, or multi-segment metering reads much of the frame and uses camera logic to recommend exposure. Center-weighted metering gives more weight to the center. Spot metering reads a small area. Nikon’s metering guide describes matrix, centre-weighted, spot, and highlight-weighted metering, noting that matrix metering is the easiest everyday mode while spot metering reads a very small region around the focus point for high-contrast situations.
Beginners do not need to switch metering modes constantly. Matrix or evaluative metering is a sound default. The bigger skill is knowing when the meter is being fooled. Bright backgrounds, stage lights, white clothing, black clothing, snow, beaches, night streets, and mixed lighting all deserve suspicion. Take a test shot. Read the histogram. Zoom in on the subject. Adjust.
The meter also reacts to composition. If the frame includes more sky, the meter may suggest a darker exposure. If the frame includes more ground, it may suggest a brighter one. In automatic modes, this means the exposure can change with every recomposition. In manual mode, once the exposure is chosen, recomposing does not change it. That stability is one of manual mode’s strongest beginner benefits in steady light. It stops the camera from changing its mind while the photographer works on framing.
Histograms show where the tones actually landed
The rear screen lies more often than beginners expect. In bright sun it may look dim. In a dark room it may look bright. Screen brightness settings, picture profiles, and ambient light all change how the preview feels. The histogram is more reliable because it shows the distribution of tones in the photo. Canon’s histogram guide describes a histogram as a graph of tonal values from black on the left to white on the right, with graph height showing the relative number of pixels at each brightness level.
A beginner does not need to read a histogram like an engineer. The left edge is shadows. The right edge is highlights. A graph bunched against the left may indicate deep shadows or underexposure. A graph bunched against the right may indicate bright highlights or overexposure. If the graph slams into the right edge and important bright detail is gone, highlights may be clipped. If it slams into the left edge and important shadow detail disappears, shadows may be blocked.
The histogram does not prescribe one perfect shape. A night photo should live mostly on the left. A snow scene should live mostly on the right. A silhouette may deliberately clip shadow detail. A white background product photo may have a tall highlight peak. The histogram is not meant to look like a mountain in the middle every time. It is meant to show whether the tones fit the subject.
RGB histograms go further by showing red, green, and blue channels separately. A flower, neon sign, sunset, stage light, or colorful clothing may clip one channel before the overall brightness histogram looks alarming. Beginners can ignore RGB histograms at first, but they become useful when colors look harsh even though the image does not seem too bright.
Blinking highlight warnings, often called zebras or highlight alert depending on the camera, are another tool. They flash over areas that may be clipped. These warnings are not perfect because they often reflect JPEG preview data rather than full RAW latitude, but they teach an essential habit: protect the highlights that matter. A small clipped light bulb may be acceptable. A clipped forehead, white dress texture, cloud edge, or product label may not be.
Manual mode plus histogram review is a strong learning loop. Set exposure with the meter, take a photo, check the histogram, adjust one setting, and shoot again. If the histogram is too far right, reduce exposure. If it is too far left and the image needs more brightness, increase exposure. Then ask which setting should change. Shutter speed? Aperture? ISO? The histogram tells you the exposure result; your subject tells you which control should move.
Many cameras also show live histograms before the shot, especially mirrorless models. This is a major advantage for beginners because exposure changes become visible before pressing the shutter. The live view may still be affected by preview settings, but it gives a close guide. DSLR users may rely more on test shots unless using live view.
The histogram turns manual mode from guessing into feedback. A beginner who checks the histogram after changing settings learns faster than one who judges only from the rear image. The graph may look technical at first, but the practical question is plain: are the tones where the photo needs them, and are important details clipped?
Auto ISO changes what manual really means
Auto ISO is one of the most misunderstood settings in manual mode. With Auto ISO off, the photographer controls aperture, shutter speed, and ISO directly. With Auto ISO on, the photographer controls aperture and shutter speed while the camera raises or lowers ISO to meet its exposure target. Nikon states this clearly for Manual mode: aperture and shutter speed values are fixed by the user, while ISO Auto changes ISO when light levels change.
This mode is not fake manual. It is a hybrid, and it is often the best practical setup for unpredictable light. A wildlife photographer may need 1/2000 second and f/5.6 while a bird moves from open sky to shade. A parent photographing children at a party may need 1/500 second and f/2.8 while kids run between rooms. Auto ISO lets the photographer protect motion and depth while the camera handles brightness shifts.
The risk is hidden quality loss. If the scene gets darker, ISO rises. The photographer may not notice until the files look noisy. The cure is to set Auto ISO limits. Many cameras let the user choose minimum ISO, maximum ISO, and sometimes minimum shutter speed in other exposure modes. In M mode, the selected shutter speed is already fixed, so the maximum ISO limit becomes critical. If image quality falls apart above ISO 6400 on your camera, set the limit there unless the moment matters more than quality.
Auto ISO also changes exposure compensation behavior. On some cameras, exposure compensation works in Manual mode only when Auto ISO is active, because ISO becomes the adjustable variable. Canon’s EOS R5 support page notes exposure compensation with ISO Auto in manual exposure. This means a photographer can choose aperture and shutter speed, let ISO float, and then bias the camera brighter or darker through exposure compensation.
Beginners should practice both approaches. Manual ISO is best for learning because it reveals the full relationship between settings. Auto ISO is best for many real shooting situations because it protects moments. The danger is using Auto ISO without knowing it is on. That is why one of the first manual-mode checks should be: is ISO manual or Auto?
A clean learning setup is manual ISO during practice in steady light. Stand near a window, place a subject on a table, and set ISO 400. Change aperture and shutter speed while watching the meter and histogram. The relationship becomes visible. Later, turn on Auto ISO, keep the same aperture and shutter speed, and move the camera from the window toward a darker corner. Watch ISO rise. Now the hybrid behavior is clear.
Auto ISO also suits flash photography poorly in some setups unless the photographer understands the camera’s flash logic. The camera may raise ISO in ways that fight the intended balance between ambient light and flash. Beginners using flash should learn their specific camera and flash system separately.
The real question is not whether Auto ISO is “allowed” in M mode. The question is whether the photographer knows which exposure variable is moving. If ISO is moving automatically, the camera still participates. If that participation supports the photo, use it. If it hides mistakes or ruins consistency, turn it off.
White balance keeps colour from drifting
White balance is not part of exposure, but it belongs near manual exposure because beginners often change brightness when the real problem is color. A photo under tungsten bulbs may look orange. A shaded portrait may look blue. A gym or office with fluorescent or LED light may look green. Exposure settings will not fix those color casts. White balance tells the camera how to interpret the color of the light.
Nikon defines white balance as the camera setting that adjusts color temperature so white objects appear white and other colors look realistic. The same Nikon guide notes that white balance is measured in Kelvin and gives daylight around 5600K, shade around 7000K, cloudy light around 6000K, fluorescent around 4000K, and tungsten around 3200K. Canon’s white balance guide makes the same practical point: digital cameras record the scene within their limits, so difficult lighting sometimes requires setting white balance to get the intended result.
Auto white balance is good enough for many beginner situations. Outdoors in daylight, modern cameras often handle color well. Indoors, mixed lighting is harder. A living room with warm lamps, window daylight, and a television creates competing colors. The camera can pick one interpretation, but it cannot make all light sources match. Manual white balance or a Kelvin setting gives more consistency from frame to frame.
RAW files give more freedom because white balance can be changed later without the same quality penalty as JPEG correction. JPEG bakes more of the color decision into the file. This does not mean RAW photographers can ignore white balance. A wildly wrong preview makes judging exposure and color harder on the shoot. Consistent white balance also speeds editing.
A beginner-friendly approach is this: leave white balance on Auto when light is simple and changing, use a preset when the light source is obvious, and use Kelvin or custom white balance when consistency matters. For daylight portraits, 5200K to 5600K may be a useful start. For shade, warmer values may look natural. For tungsten lamps, 3000K to 3500K often neutralizes orange. These numbers are starting points, not laws.
White balance also affects mood. A technically neutral sunset may look lifeless if the warmth is removed. A blue hour street scene may lose its atmosphere if corrected too heavily. Product photography, skin tone work, and artwork reproduction demand accuracy. Travel, documentary, and creative work may allow mood. White balance is not always about making color neutral; it is about making color intentional.
Manual mode does not require manual white balance, but pairing the two helps when consistency matters. If you are photographing a product, a room, a food plate, a portrait session, or a set of images meant to match, set exposure manually and control white balance. That creates a stable batch of files instead of a folder where brightness and color drift from shot to shot.
Focus settings sit beside exposure, not inside it
Manual mode controls exposure, not focus. This distinction saves beginners from confusion. A camera can be in M mode and still use autofocus. It can be in Auto exposure and manual focus. Exposure mode and focus mode are separate systems, even though camera menus may place them close together.
A blurry manual-mode photo may have perfect exposure and bad focus. A dark photo may have perfect focus and bad exposure. Beginners often blame “manual settings” for every failure. The fix is diagnosis. If nothing is sharp, suspect camera shake, subject motion, or missed focus. If one plane is sharp but the subject is not, suspect focus point placement. If the subject is sharp but the image is too bright or dark, suspect exposure.
Autofocus mode matters for moving subjects. Single AF, often AF-S or One Shot, locks focus for still subjects. Continuous AF, often AF-C or AI Servo, keeps adjusting focus for moving subjects. Face detection, eye detection, subject tracking, zone AF, single point AF, and wide-area AF all change how the camera decides what to focus on. Manual exposure does not override those choices.
Depth of field links focus and aperture. At f/1.8, the focus zone may be thin. If the camera focuses on an eyebrow instead of an eye, the portrait may look wrong. At f/8, more depth may hide small focus errors. That does not make f/8 better; it makes it more forgiving. Wide aperture raises the demand on focus accuracy. This is one reason new photographers should not shoot every portrait at the lowest f-number their lens allows.
Focus distance also changes depth. Close-up work has shallow depth even at narrow apertures. A flower photographed from 20 centimeters away at f/8 may have only a slice in focus. A street scene focused 10 meters away at f/8 may look sharp across much of the frame. Beginners who understand this stop blaming the aperture alone.
A practical focus workflow in M mode is to decide the subject first, then pick focus mode, then pick aperture. For a still portrait, use single AF or eye AF if available, choose f/2.8 to f/4 for safer depth, and check the eye at playback. For moving children, use continuous AF, choose a faster shutter speed, and avoid an aperture so wide that tiny focus shifts ruin the shot. For scenery, use a smaller aperture and focus at a distance that gives foreground and background enough sharpness.
Manual focus has its place. Night sky photography, macro work, product shots on a tripod, and video may use manual focus because autofocus hunts or changes during the shot. Modern mirrorless cameras often offer focus peaking and magnification, which make manual focus easier. Still, a beginner does not need manual focus to learn M mode. Start with autofocus unless focus itself is the problem.
The camera settings that matter most are the ones tied to failure. For a fast subject, shutter speed and continuous focus matter more than exact ISO cleanliness. For a portrait at f/1.8, focus point and aperture matter more than metering mode. For a tripod scenery image, aperture, focus distance, and histogram matter more than fast shutter speed. M mode teaches exposure, but good photos also need focus discipline.
The beginner workflow starts with the thing that must not fail
Manual mode becomes manageable when the settings are chosen in order. The order is not always aperture, shutter speed, ISO. It depends on what would ruin the photo first. Start with the failure you cannot accept. If blur would ruin the shot, start with shutter speed. If too little depth would ruin it, start with aperture. If image noise must be low because the subject is static and quality matters, start with ISO and use a tripod if needed.
This is the beginner workflow:
Choose the thing that matters most visually or technically. Set that value first. Choose the second setting that protects the image. Adjust the third setting, or ISO, to land the exposure. Take a test frame. Read the subject, the histogram, and the sharpness. Change one setting at a time.
For portraits, aperture often comes first because depth of field shapes the look. A single-person portrait might start at f/2.8 or f/4. Then shutter speed must be high enough to avoid subject movement and hand shake, often 1/125 or faster for a posed person, higher for children. ISO then rises or falls to match the light. If the image is too dark at ISO 3200 and the quality is unacceptable, add light, move to brighter light, use a wider aperture, or slow the subject down.
For sports, shutter speed comes first. Start at 1/1000 second in good light for many field sports, faster if needed. Aperture then opens enough to gather light and separate the subject, often as wide as the lens allows. ISO completes the exposure. If ISO goes too high, the options are limited: accept noise, use a brighter lens, shoot in better light, or choose a slower shutter speed only if blur remains acceptable.
For scenery on a tripod, ISO and aperture often come first. Use base ISO for quality. Choose f/8 or f/11 for depth. Shutter speed becomes whatever the meter and histogram require because the tripod removes hand shake. If wind moves leaves or water, shutter speed becomes a creative decision rather than only an exposure setting.
For indoor family moments, shutter speed and aperture usually matter before ISO. A beginner may want low ISO, but moving people demand speed. Start around 1/250 second for active children, use the widest aperture that keeps enough faces sharp, and raise ISO. A noisy sharp image has life; a clean blurred one usually does not.
Beginner exposure decisions by shooting situation
| Situation | First setting to choose | Safe starting point | Main risk | Likely adjustment |
|---|---|---|---|---|
| Posed portrait outdoors | Aperture | f/2.8 to f/4 | Missed focus or harsh highlights | Raise shutter speed, lower ISO |
| Children indoors | Shutter speed | 1/250 to 1/500 | Motion blur | Raise ISO, open aperture |
| Scenery on tripod | Aperture and ISO | f/8, ISO 100 | Wind blur or clipped sky | Change shutter speed, bracket |
| Street in changing light | Shutter speed | 1/250 | Missed moments | Use Auto ISO |
| Sports in daylight | Shutter speed | 1/1000 | Subject blur | Open aperture, raise ISO |
| Night tripod scene | ISO and shutter | ISO 100, long exposure | Camera shake or blown lights | Use timer, adjust exposure |
This table is not a lawbook. It gives beginners a decision order. The numbers become personal after testing your camera, lens, hands, and subjects.
The workflow should feel boring. Good manual exposure is often boring on purpose. Set, test, adjust, shoot. The creative work happens because the technical decisions stop changing unpredictably. Once the light is stable, manual mode lets the photographer concentrate on expression, timing, and composition.
A safe daylight setup for first practice
The best first manual-mode practice happens in daylight, not at night. Daylight gives enough brightness for mistakes, low ISO, safe shutter speeds, and visible changes. Put the camera in M mode, turn off Auto ISO for the first session, choose RAW if available, and find a subject that does not move. A cup on a table near a window, a plant outside, a parked bicycle, or a person willing to stand still will work.
Start with ISO 100 or 200. Set aperture to f/5.6. Set shutter speed to 1/250 second. Point the camera at the subject and look at the exposure meter. If the meter shows the image will be too dark, slow the shutter to 1/125 or 1/60, open the aperture to f/4, or raise ISO to 400. If the meter shows too bright, use 1/500 or 1/1000, close aperture to f/8, or lower ISO if possible. Take a photo and check the histogram.
This exercise teaches more than a chart because the camera responds to your specific light. A cloudy day, bright window, shaded balcony, and direct sun all produce different readings. Manual mode stops being abstract when you see one setting move the meter and the image.
Next, keep exposure similar while changing the look. Take a photo at f/2.8, if your lens allows, and adjust shutter speed faster to keep brightness similar. Then take one at f/8 and adjust shutter speed slower. Compare background blur. The subject brightness should remain close, but the depth changes. That is aperture learning.
Then choose one aperture, such as f/5.6, and change shutter speed from 1/1000 to 1/30 while adjusting ISO or aperture as needed. If the subject is still, the slower shots may remain sharp if your hands are steady. Now ask someone to wave a hand or walk through the frame. Motion blur appears. That is shutter learning.
Finally, keep aperture and shutter speed fixed and raise ISO. Compare ISO 100, 400, 1600, and 6400. View on a larger screen. The brightness changes unless you compensate with another setting, but the visible noise lesson is direct. B&H and Cambridge in Colour both connect higher ISO with higher noise, and your own files show where that matters for your camera.
Avoid direct noon sun for the first practice if possible. Hard light creates deep shadows and bright highlights that complicate exposure. Open shade or window light is kinder. It gives the beginner a clean view of setting changes without extreme contrast.
Do not practice first at a wedding, concert, sports game, birthday candle moment, or paid shoot. Manual mode needs low-pressure repetition. The beginner should be free to make bad frames and read them. Ten minutes of deliberate practice in steady daylight beats three hours of panic in a dark room.
The first win is not a beautiful photo. The first win is knowing why the photo changed. If the background got blurrier because the aperture opened, that is a win. If the moving hand froze because the shutter got faster, that is a win. If noise rose because ISO climbed, that is a win. Manual mode begins as cause and effect before it becomes style.
Portrait settings start with face sharpness and background control
Portraits are a good manual-mode classroom because the priorities are clear. The face should look good. The eyes should be sharp. The background should support the subject rather than fight for attention. Exposure should protect skin tones and important highlights. Everything else is secondary.
A single-person portrait in soft daylight can start around f/2.8 to f/4, 1/250 second, ISO 100 to 400. If the subject is very still and the lens is not long, 1/125 may work. If the subject is moving, laughing, turning, or a child, 1/250 to 1/500 is safer. If the background is distracting, open the aperture if focus depth allows, move the subject farther from the background, use a longer focal length, or move closer.
Beginners often set f/1.8 because they want blur. That may work for a careful portrait, but it also narrows the focus zone. If the subject turns slightly, one eye may be sharp and the other soft. If the photographer focuses and recomposes, the focus plane may shift enough to miss. A safer starting point is f/2.8 or f/4 for one person, especially on larger sensors. For two people, f/4 to f/5.6 is safer. For groups, f/5.6 to f/8 is often safer, depending on arrangement.
Skin exposure deserves care. If the light is soft and even, the meter may do well. If the subject is backlit, the camera may underexpose the face. In manual mode, expose for the face and accept that the background may brighten. Use the histogram and highlight warnings to protect important details, especially foreheads, cheeks, white clothing, or bright hair. If the background is much brighter than the face, a reflector, fill flash, or change of position may solve more than exposure changes.
White balance matters for skin. Shade may turn skin blue. Indoor bulbs may turn it orange. Mixed light can create patches of different color across the face. Auto white balance may shift between frames as clothing, background, or framing changes. For a portrait set, a fixed white balance often gives more consistent files. Nikon’s and Canon’s white balance guides both treat white balance as the setting that corrects or controls color under different light sources.
Focus should be on the near eye for most portraits, especially at wide apertures. Eye AF is useful if the camera offers it, but it should still be checked. If the camera chooses the wrong eye or jumps to eyelashes, hair, or glasses frames, use a smaller focus area or stop down a little. Manual exposure does not excuse missed focus.
A beginner portrait workflow is steady. Put the subject in soft light. Choose aperture for background and number of faces. Choose shutter speed for subject movement and focal length. Set ISO for exposure. Take a test shot. Check the eyes. Check the skin highlights. Check the background. Adjust one thing.
Portrait manual mode is not about copying f/1.8 settings from the internet. It is about matching depth, movement, light, and skin tone to the person in front of the camera. A slightly less blurry background is a good trade if it keeps both eyes sharp and the expression alive.
Travel and street settings need readiness more than perfection
Travel and street photography punish slow decision-making. The light changes, subjects move, scenes appear and vanish, and the photographer may not get a second chance. Manual mode still works, but the settings need to favor readiness. Perfect exposure is less useful than a sharp, timed, believable frame.
A common starting point for daylight street work is f/5.6 or f/8, 1/250 second, and Auto ISO with a sensible maximum. The aperture gives enough depth for quick framing. The shutter speed handles walking people and handholding. Auto ISO absorbs changes between sun and shade. If the light is stable, manual ISO works too, but Auto ISO often keeps the photographer faster.
For brighter sun, the shutter speed may rise to 1/500 or 1/1000 to avoid overexposure. For evening streets, open the aperture to f/2.8 or f/4 and decide whether motion blur is acceptable. If the scene is about still architecture, a slower shutter may work. If it includes people, keep the shutter speed high enough for the gesture.
Zone focusing is useful for street work, though not required. Stop down to f/8, focus at a moderate distance, and let depth of field cover likely subjects. This works best with wider lenses and good light. It is harder with long lenses, wide apertures, and close subjects. Beginners can use autofocus and still benefit from manual exposure.
Travel photography also includes interiors, markets, food, landmarks, friends, and night scenes. One setting recipe cannot serve all of them. The decision order must change quickly. For a friend in front of a monument, choose face exposure and enough depth. For a market vendor’s hands, choose shutter speed and focus. For a hotel room detail, choose ISO quality and stabilize. For a city skyline at dusk, use a tripod or stable surface and expose carefully for highlights.
The camera meter can be fooled by bright skies, reflective buildings, dark alleys, and night signs. Manual mode gives consistency when shooting a sequence. Meter once, test, check the histogram, and keep the settings while the light remains similar. If the camera is in an automatic mode, every change in framing may alter exposure, which makes a set of images harder to edit together.
Travel also demands battery and memory discipline. Manual mode encourages review, but constant chimping can make the photographer miss moments. Check exposure when the light changes, not after every frame. If moving from sun into a museum, reset. If leaving a restaurant at night, reset. If turning from a shaded street to a bright square, reset.
The best travel manual setup is the one that keeps the camera ready before the scene happens. A technically perfect setting found ten seconds late has no value. For beginners, that often means manual shutter and aperture with Auto ISO, a mid-depth aperture, and a shutter speed that prevents casual blur.
Indoor family photos punish slow shutter speeds
Indoor family photography is where beginners discover that “bright enough to my eyes” does not mean bright enough for a camera. Human vision adapts. Cameras still need exposure. A living room at night may look comfortable, but the camera may need f/2.8, 1/125 second, ISO 6400 or more. If children are moving, 1/125 may still be too slow.
The most common beginner failure indoors is choosing low ISO and letting the shutter speed fall. A photo at ISO 400, f/4, and 1/15 second may look clean in theory, but people will blur. Raise the ISO. Open the aperture if depth allows. Add light if possible. Move people closer to a window during the day. Turn on more lamps, but watch mixed color. Use flash if you know how to bounce it.
For active children indoors, start at 1/250 second. If they are running, jumping, or dancing, try 1/500. Use the widest aperture that keeps enough of the subject sharp. For one child, f/2 to f/2.8 may work if focus is accurate. For several children at different distances, f/4 or f/5.6 may be needed, which forces ISO higher. This is a physical limit, not a moral failure.
For adults sitting at a table or opening gifts, 1/125 may work. For a baby sleeping, 1/60 may work with a steady hand and stabilization. For a group posing near a window, f/5.6, 1/125, and ISO adjusted to taste may work. The subject’s movement sets the floor.
White balance indoors needs attention. Tungsten lamps warm the scene. LEDs vary widely. Window light mixed with lamps creates split color. Auto white balance may change from frame to frame as the camera sees different walls, clothes, and faces. A fixed Kelvin setting or preset gives more consistency, though mixed light may still need editing.
Flash changes the problem. A bounce flash can add clean light, lower ISO, freeze motion, and improve skin tone. But flash has its own exposure logic: aperture and ISO affect flash brightness, shutter speed controls ambient light up to sync-speed limits, and flash power or TTL controls the burst. Beginners should not pile flash learning on top of first manual-mode practice unless they are ready. Still, it is worth knowing that many “bad indoor camera” problems are really “not enough light” problems.
A practical indoor manual setup for a family gathering is f/2.8 or f/4, 1/250 second, Auto ISO with a maximum you accept, continuous AF for moving children, and RAW. If the files are too noisy, add light rather than dropping to 1/30. If the depth is too shallow, stop down and accept higher ISO or use flash.
Indoor photography teaches the hard truth of manual mode: exposure settings cannot invent light without a trade-off. You pay with blur, depth, noise, or added lighting. The skill is choosing the least damaging payment.
Sports, pets, children, and fast action
Fast subjects make shutter speed the first decision. Sports, pets, birds, bicycles, dancing, playgrounds, and running children all need enough shutter speed before anything else. A beautiful aperture and low ISO do not matter if the subject smears. Manual mode is useful because it lets the photographer protect the shutter speed instead of letting the camera choose something too slow.
For many outdoor sports in daylight, start around 1/1000 second. Faster action may need 1/1600 or 1/2000. Slower movement may work at 1/500. Pets running toward the camera often need both fast shutter and strong autofocus. Children indoors may need 1/500 but rarely have enough light for it without high ISO or a wide aperture. B&H’s exposure example for a baseball pitch discusses needing a fast shutter speed and raising ISO as light falls, which reflects the same practical trade-off.
Aperture is often wide for action because light is needed. f/2.8, f/4, or the lens’s widest aperture lets the shutter stay fast. Wide aperture also separates the subject from the background, which suits sports and wildlife. The cost is focus precision. Continuous AF and subject tracking become more important. If the camera misses focus, stopping down slightly may improve hit rate, but it requires more ISO.
Auto ISO is very strong for action. Set shutter speed for motion, aperture for light and depth, and let ISO react. Nikon’s Manual mode Auto ISO behavior supports exactly this kind of workflow: the user fixes aperture and shutter speed while ISO changes with light. Set a maximum ISO that fits the job. For a child’s soccer game, noisy images may be acceptable. For commercial sports work, noise tolerance may be lower and faster lenses or better lighting matter.
Burst mode helps, but it does not replace timing. Continuous shooting increases chances, yet a burst of blurry frames remains blurry. Shutter speed and focus mode do the real work. Use continuous AF, choose a focus area suited to the subject, and keep the subject under the active area. For erratic pets and children, wider tracking areas may help. For predictable sports, zone or single-point tracking may work better.
Panning is the exception where slower shutter speeds are used intentionally. A cyclist at 1/60 second, tracked smoothly with the camera, may appear sharp against a streaked background. This is not beginner action safety; it is a creative technique. Learn freeze first, then try panning.
Fast action also reveals shutter type issues. Electronic shutters may create rolling-shutter distortion with fast movement or flickering lights on some cameras. Mechanical shutter may be safer for certain sports or indoor lighting. This is camera-specific. Beginners do not need to master it immediately, but if fast-moving objects bend oddly or indoor sports show bands, shutter type may be part of the issue.
Action photography in M mode is brutally clarifying. The shutter speed is either fast enough or it is not. Once that is set, the remaining decisions become negotiations with aperture, ISO, autofocus, and available light.
Low light without flash
Low light is not one problem. It includes night streets, dim homes, concerts, churches, restaurants, museums, and blue hour. Each has different movement, color, and permission limits. Manual mode works well because it forces honest trade-offs. The question is not “what are the best low-light settings?” The question is “what can move, what must stay sharp, and how much noise is acceptable?”
If the subject is still and the camera can be stabilized, low light is easy. Use low ISO, choose the aperture for depth, and let the shutter speed become long. A tripod, wall, table, or railing removes hand shake. Use a two-second timer or remote release to avoid moving the camera when pressing the shutter. This is ideal for interiors, cityscapes, architecture, and night scenes where people are not the subject.
If the subject moves, low light becomes harder. A concert singer, child, server in a restaurant, or friend walking under streetlights needs shutter speed. Open the aperture. Raise ISO. Accept noise. If the photo is still too dark, the answer is more light, a brighter lens, a slower subject, or a different creative choice. There is no hidden setting that gives fast shutter, deep focus, low ISO, and dim light all at once.
Night streets often look best when not over-brightened. The meter may try to make the night scene too bright, lifting shadows until the mood disappears and highlights blow out. Manual mode allows underexposure relative to the meter while preserving signs, windows, and lamps. Use the histogram to watch highlight clipping. A dark frame with protected highlights may edit better than a bright frame with blown neon.
Concerts and stage events need highlight discipline. Spotlights can clip faces quickly. The background may be black, and that is fine. Expose for the lit face or costume, not the whole stage. Matrix metering may be confused by darkness around the subject. Spot or highlight-weighted metering, if available, may be useful, but manual test exposure is often cleaner. Nikon’s metering guide describes highlight-weighted metering as a mode that gives preference to highlights to prevent them from blowing out.
Museums and churches often restrict tripods and flash. Use stabilization if available, open the aperture, raise ISO, and brace your body. Photograph still details rather than moving people if the shutter speed is slow. Watch white balance because old interiors may combine daylight, tungsten, LED, and stained glass.
Low light also demands realistic expectations from the lens. A kit zoom at f/5.6 on the long end gathers far less light than a prime lens at f/1.8. Opening from f/5.6 to f/2 gives three stops of light, enough to move from 1/30 to 1/250 at the same ISO. That is why brighter lenses matter indoors. They do not create light; they admit more of it.
Low-light manual mode is the art of refusing impossible combinations. Decide whether to pay with shutter speed, aperture depth, ISO noise, or added support. Once that is accepted, the settings become straightforward.
Long exposures, tripods, and intentional blur
Long exposure is manual mode slowed down. Instead of fighting blur, the photographer chooses blur deliberately. Water smooths. Clouds stretch. Cars become light trails. Crowds fade. Night scenes gather detail. The camera must stay stable because only selected parts of the scene should move.
Use a tripod or stable surface. Turn off or adjust stabilization if the camera or lens manual recommends doing so on a tripod, because some systems can behave oddly when no movement is present. Use a timer, remote, cable release, or app. Compose carefully before the exposure begins. Long exposures reveal sloppy framing because there is time to notice every edge.
Start with low ISO, often ISO 100. Choose aperture for depth, often f/8 or f/11 for scenery and architecture. Then set shutter speed for exposure and motion effect. A waterfall may look silky at 1/2 second or 2 seconds. Traffic trails may need 5 to 30 seconds. Star points need special handling because Earth’s rotation makes stars trail if the exposure is too long for the focal length. Comets and night-sky subjects often need shorter exposures than beginners expect; Nikon’s comet photography advice, for example, recommends short multi-second exposures to preserve detail in the comet’s nucleus.
In bright daylight, long exposure needs less light. Even at ISO 100 and f/16, the scene may be too bright for a one-second exposure. A neutral density filter reduces incoming light without changing color much, allowing slower shutter speeds. Nikon describes ND filters as another way to control exposure alongside shutter speed, aperture, and ISO by cutting light from the scene.
Manual mode is ideal here because automatic modes may keep changing exposure if moving water, clouds, or light sources shift. Set the exposure based on the important highlights, take a test shot, then adjust. If the water is not smooth enough, slow the shutter. To keep brightness the same, close aperture, lower ISO, or use an ND filter. If the scene is too bright even at the lowest ISO and narrow aperture, stronger ND is needed.
Long exposures also reveal sensor heat, hot pixels, and noise reduction settings. Many cameras have long-exposure noise reduction, which takes a dark frame after the photo and doubles the waiting time. This may be useful for very long exposures but frustrating during rapid shooting. Beginners should test it before relying on it.
Bulb mode is used for exposures beyond the camera’s normal maximum shutter speed, often 30 seconds. The shutter stays open as long as the release is held or until a timer ends, depending on the system. This is useful for night scenes, star trails, and very strong ND filters. It also increases the need for stable equipment and battery awareness.
Long exposure is where manual mode feels most literal: the photographer decides how long the camera watches the world. A fast shutter records an instant. A long shutter records time. The same setting that ruins an action photo may create a beautiful night image when used with intent.
Scenery and detail work need depth, edges, and highlight control
Scenery, architecture, interiors, and detailed static subjects reward patient manual exposure. The subjects usually do not run away. The photographer has time to set depth, check edges, read the histogram, and refine. These are good genres for beginners who want to understand exposure without subject pressure.
A common starting point is ISO 100, f/8, and shutter speed adjusted to the meter. If handholding, keep the shutter speed safe for the focal length. If using a tripod, let shutter speed fall as needed. f/8 often gives enough depth and strong lens performance. f/11 may be useful for deeper focus. f/16 or f/22 may extend depth but can soften fine detail through diffraction on many systems, so test your camera and lens.
Depth of field matters because scenery often includes foreground, middle distance, and background. Canon’s depth-of-field guide explains that smaller apertures increase the zone that appears sharp and that greater subject distance increases depth of field. Beginners often focus on the far horizon and then wonder why foreground rocks or flowers are soft. A more careful focus point, often somewhere into the scene rather than at infinity, may improve the result. Hyperfocal distance calculators exist, but beginners can start by focusing roughly one-third into the important depth and checking the image at playback.
Highlights need protection. Bright clouds, sunlit buildings, water reflections, and windows can clip. The histogram is useful here because the rear preview may hide clipped detail. Canon’s histogram guide describes luminance and RGB histograms as exposure tools, which is exactly their role in scenery work. If the sky clips, reduce exposure until important highlight detail returns. Shadows may be lifted later if shooting RAW, though every camera has limits.
Tripods change the exposure equation. With the camera stable, ISO can stay low and shutter speed can lengthen. This improves quality for static scenes. The trade-off is moving elements: leaves, water, people, flags, and clouds may blur. Sometimes that blur is attractive. Sometimes it ruins detail. If wind is moving leaves, raise shutter speed and ISO rather than assuming tripod equals perfect sharpness.
Architecture needs straight lines and controlled perspective. Exposure settings do not fix leaning buildings caused by camera tilt. Manual mode handles brightness; composition and lens choice handle geometry. Stop down enough for depth, keep ISO low if possible, and check corners. Interiors often contain windows much brighter than the room. Decide whether the window detail matters. If it does, expose for highlights and brighten shadows later or bracket exposures.
Close detail work, such as food, crafts, flowers, and objects, has shallow depth at close distances. f/8 may not give as much focus as expected. Use a tripod, stop down, and place focus carefully. For product-style results, add light rather than raising ISO too much. For handheld detail shots, use a fast enough shutter to avoid shake.
Static subjects let beginners practice the full manual loop without panic: choose depth, protect highlights, stabilize if needed, and refine after reviewing the histogram. That discipline carries over to faster genres later.
Manual video settings follow a different rhythm
Manual exposure for video uses the same three controls, but the priorities shift. Shutter speed is not only about freezing motion; it affects motion cadence. Many video shooters use a shutter speed near double the frame rate, often called a 180-degree shutter approach. At 24 frames per second, that suggests about 1/50 second. At 30 fps, about 1/60. At 60 fps, about 1/125. This is a convention, not a law, but it gives motion a familiar look.
Aperture still controls depth of field and light. ISO still affects brightness and noise. White balance becomes even more important because color shifts during a clip are distracting. Manual focus or controlled autofocus behavior may matter because focus hunting is visible in motion. Manual exposure is common in video because automatic brightness changes during a shot look amateurish unless deliberately used.
Sony’s support guide for movie shooting explains that when exposure control is set to P/A/S/M mode, aperture can be set with the front dial and shutter speed with the rear dial, while ISO sensitivity is changed through the menu or assigned controls. Sony also notes separately that movie or S&Q modes may use program or automatic exposure unless the exposure mode is switched after selecting the movie mode.
This matters because beginners may set the photo mode to M and assume video follows. On some cameras it does. On others, video exposure mode is separate. Check the screen while recording mode is active. Confirm that aperture, shutter speed, and ISO are actually under the intended control.
Video also exposes the limits of shutter speed as an exposure tool. In still photography, if the scene is too bright, raising shutter speed is often harmless unless motion blur is desired. In video, raising shutter speed too high may create choppy motion. If the aperture is wide for shallow depth and the shutter speed is tied to frame rate, bright daylight may require an ND filter. This is why ND filters are common in video work. They reduce light while preserving aperture and shutter cadence.
Auto ISO in video can be useful for documentary work but may cause brightness changes inside a clip. If the subject walks from shade to sun, Auto ISO may protect exposure. If the light flickers or the frame changes, it may pump brightness visibly. Manual ISO gives consistency but demands planning.
A beginner video setup might be 25 fps or 30 fps, shutter around 1/50 or 1/60, aperture chosen for depth, ISO adjusted for exposure, fixed white balance, and manual or carefully configured autofocus. If the scene is too bright, use ND or close aperture. If it is too dark, open aperture, raise ISO, add light, or accept a different look.
Manual video settings are less forgiving because the camera records every exposure change over time. A still photo only needs one good instant. A video clip needs consistent exposure, color, focus, and motion across the whole shot.
JPEG versus RAW changes the safety margin
Manual mode produces the exposure, but file format controls how much flexibility remains afterward. JPEG files are processed in the camera. Contrast, sharpening, noise reduction, color, white balance, and picture style are baked into a smaller file. RAW files preserve more sensor data and allow deeper editing of exposure, white balance, highlights, shadows, and color. RAW does not fix every mistake, but it gives more room.
Beginners sometimes avoid RAW because files are larger and editing is required. That is reasonable for casual use. JPEGs are convenient, fast to share, and often look good straight from the camera. But while learning manual mode, RAW is useful because it separates capture mistakes from processing choices. If white balance is wrong, RAW makes correction easier. If highlights are close but not destroyed, RAW may recover more. If shadows are dark, RAW may tolerate lifting better than JPEG.
Adobe’s exposure guide notes that exposure can be adjusted afterward in photo editing software, but this should not be read as permission to ignore exposure. Editing is a safety margin, not a replacement for capture. Clipped highlights cannot always be recovered. Motion blur cannot be fixed cleanly. Missed focus stays missed. Heavy shadow lifting increases noise.
A useful beginner setting is RAW plus JPEG if the camera allows it. The JPEG gives quick previews and sharing. The RAW file gives editing insurance. After a few weeks, the photographer can decide whether RAW is worth the storage and workflow.
Picture profiles matter too. A high-contrast JPEG style may make shadows look blocked and highlights look harsh even when the RAW file contains more detail. A flat profile may look dull but preserve editing room. Beginners should avoid changing too many processing settings while learning exposure. Use a standard profile, shoot RAW if possible, and focus on aperture, shutter speed, ISO, histogram, and focus.
RAW also changes white balance confidence. Since white balance can be adjusted later more cleanly, the beginner can prioritize exposure and sharpness. Still, setting a close white balance in-camera makes previews more reliable and editing faster. For a session with consistent light, fixed white balance is still worth using.
Manual mode plus JPEG demands more precision in camera. Get exposure and white balance closer because there is less room later. Manual mode plus RAW gives forgiveness, but also tempts laziness. The best habit is the same for both: expose carefully, protect important highlights, keep shutter speed safe, and treat editing as refinement.
RAW gives beginners more room to learn, but it does not repeal physics. A RAW file cannot turn a 1/15-second blur of a running child into a crisp action frame. The exposure settings still matter at the moment of capture.
Metering modes and when to change them
Metering mode tells the camera how to read light from the frame. In manual mode, the meter does not change settings for you unless Auto ISO or exposure aids are active, but it still tells you what it thinks. Understanding metering helps you know when the meter reading deserves trust.
Evaluative, matrix, or multi metering reads much of the frame and uses camera logic to recommend exposure. It is the best default for beginners because it handles many everyday scenes. Center-weighted metering gives priority to the center area. Spot metering reads a small zone, often tied to the focus point or center depending on camera. Highlight-weighted metering, found on some systems, protects bright tones.
Nikon’s guide describes four metering types in Nikon cameras: matrix, centre-weighted, spot, and highlight-weighted. It describes matrix metering as a broad everyday mode, center-weighted as center-prioritized, spot metering as very precise, and highlight-weighted as protecting bright areas. Cambridge in Colour explains the technical reason metering can fail: the camera measures reflected light and subjects differ in reflectance.
When should a beginner change metering mode? Less often than expected. If you are in manual mode, you can usually leave the meter in evaluative or matrix, take a test shot, and adjust. Spot metering is useful when one small subject must be exposed correctly and the rest of the frame is misleading. A singer under a spotlight, a face against a bright window, a bird against a bright sky, or a dark object on snow may benefit from a tighter reading.
The danger of spot metering is that it demands knowledge of the tone being metered. If you spot meter a white dress and place it at zero, the camera may try to make it middle gray. If you spot meter dark hair and place it at zero, it may become too bright. Spot metering gives control, but it does not remove judgment.
Center-weighted metering is useful for portraits, stage work, and scenes where the subject is near the center. It is less reactive to bright edges than evaluative metering, but it still reads a broad region. Highlight-weighted metering is useful when blown highlights are the main danger, such as stage lights, white clothing in sun, or reflective surfaces.
Manual mode reduces dependence on metering mode because the photographer can lock exposure after testing. For a portrait session in steady light, the exact metering mode matters little once the exposure is set correctly for the face. For changing light, it matters more because the meter remains part of the adjustment process.
A beginner should learn one default deeply before switching constantly. Use matrix or evaluative. Notice when it fails. Then use spot or center-weighted to solve a specific problem. Random metering changes create confusion. Purposeful changes teach.
Metering mode is not a magic exposure setting. It is the camera’s listening pattern. Manual mode still requires the photographer to decide whether the camera listened to the right part of the scene.
Exposure compensation in M mode needs a careful definition
Exposure compensation is easy in aperture priority, shutter priority, and program modes: it tells the camera to make the automatic exposure brighter or darker than its meter target. In full manual exposure with manual ISO, there is usually nothing for exposure compensation to change because the photographer has fixed aperture, shutter speed, and ISO. The meter indicator may shift, but the camera cannot alter exposure unless another automatic variable exists.
This is why beginners get confused when exposure compensation appears or disappears in M mode. On many cameras, exposure compensation in Manual mode matters only with Auto ISO. The photographer fixes aperture and shutter speed, the camera controls ISO, and exposure compensation biases the ISO choice brighter or darker. Canon’s EOS R5 manual exposure support specifically refers to exposure compensation with ISO Auto, and Nikon’s Auto ISO explanation describes ISO changing in Manual mode as light changes.
Suppose you are photographing a backlit person in M mode with Auto ISO. You set f/2.8 and 1/250 second. The camera chooses ISO 400 based on the whole frame, but the face is too dark. Exposure compensation of +1 may cause the camera to choose ISO 800, brightening the image while preserving your aperture and shutter speed. That is useful. But if ISO is manually set to 400, the same compensation dial may not brighten the photo because no exposure variable is free to move.
Some cameras show exposure compensation as a shifted meter target even with manual ISO. The scale may tell you how far your chosen settings are from the compensated target. That still does not change the exposure by itself. The photographer must move shutter speed, aperture, or ISO.
This distinction matters for teaching. Beginners may think exposure compensation is broken in M mode. It is not broken; it needs an automatic control to act on. If all three exposure values are fixed, compensation becomes advice rather than action.
The manual alternative is direct adjustment. Want the photo brighter? Slow shutter, open aperture, raise ISO, add light, or change the scene. Want it darker? Faster shutter, narrower aperture, lower ISO, reduce light, or change framing. Exposure compensation is a shortcut for automatic systems; manual mode uses the controls themselves.
With Auto ISO, exposure compensation is worth learning. It lets the photographer keep shutter and aperture decisions while correcting the meter’s bias. For wildlife in snow, +1 may keep the subject and snow brighter. For a dark stage, -1 may preserve mood and highlights. For backlit portraits, +1 may lift faces. The exact value needs testing.
Exposure compensation in M mode is not one universal behavior. It depends on whether ISO or another exposure variable is automatic on that camera. Beginners should test their specific model: set M mode, turn Auto ISO on, dial compensation, watch ISO. Then turn Auto ISO off and repeat. The behavior becomes clear in one minute.
Reading mistakes from bad photos
Bad photos are useful if they are read correctly. Manual mode gives beginners clean evidence because the settings are visible in the file metadata. Instead of saying “the camera did something weird,” the photographer can inspect aperture, shutter speed, ISO, focal length, and exposure compensation. The mistake usually has a pattern.
A dark photo means the exposure was too low for the intended result. The fix is not always “raise ISO.” Maybe the shutter speed was faster than needed. Maybe aperture was too narrow. Maybe the light source was behind the subject. Maybe the meter was fooled by bright surroundings. Check the histogram and the subject. Brighten through the setting with the least harmful side effect.
A bright washed-out photo means exposure was too high or highlights exceeded the sensor’s range. Reduce exposure with faster shutter, narrower aperture, lower ISO, or less light. If only small specular highlights clip, that may be acceptable. If skin, clouds, clothing, or product detail clips, reduce exposure.
A blurry subject with a sharp background often means subject motion. Use faster shutter speed. A blurry whole frame often means camera shake, missed focus, or both. Use faster shutter speed, stabilize the camera, improve handholding, or check focus. A sharp ear and soft eye means focus point or depth issue. Use eye focus, move the focus point, stop down, or change subject pose.
A noisy photo means ISO was high or the image was underexposed and brightened later. Noise may be acceptable if the moment matters. If quality matters more, add light, use a wider aperture, slow shutter with stabilization, or use a tripod for still subjects. Do not reduce ISO at the cost of motion blur unless the subject is still.
An image with strange color means white balance or mixed light. Set a fixed white balance, shoot RAW, avoid mixed sources, or correct in editing. Exposure settings do not solve a green gym or orange lamp problem.
A photo where the background is too sharp needs wider aperture, longer focal length, closer camera-to-subject distance, or more subject-to-background distance. A photo where not enough is sharp needs narrower aperture, better focus placement, more subject alignment, or greater camera distance.
Mistake diagnosis from the first test photo
| What the photo looks like | Likely cause | Setting to inspect first | Clean beginner fix |
|---|---|---|---|
| Entire frame is dark | Too little exposure | Meter, histogram, ISO | Open aperture, slow shutter, or raise ISO |
| Bright areas have no detail | Highlight clipping | Histogram right edge | Reduce exposure and test again |
| Moving person is smeared | Shutter too slow | Shutter speed | Use 1/250, 1/500, or faster |
| Whole image is soft | Camera shake or missed focus | Shutter and focus point | Faster shutter, stabilize, refocus |
| Face is sharp but ears soft | Depth too shallow | Aperture | Stop down from f/1.8 to f/2.8 or f/4 |
| Image is grainy | High ISO or lifted shadows | ISO and exposure | Add light, lower ISO if shutter allows |
| Color looks orange or blue | White balance mismatch | WB setting | Use preset, Kelvin, or RAW correction |
This table is meant for review after a test frame. A beginner who learns to diagnose one visible problem at a time will progress faster than one who changes every setting at once.
The rule during correction is simple: change one thing and take another photo. If you change shutter, aperture, ISO, metering, focus mode, and white balance together, you may fix the image but learn nothing. Manual mode rewards controlled experiments.
Every bad manual photo contains a lesson if the settings are read against the subject. The camera recorded not only the image, but the decision that made it.
Brand differences should not distract beginners
Canon, Nikon, Sony, Fujifilm, OM System, Panasonic, Leica, Pentax, and other camera brands use different menus, button names, dial layouts, and icons. This creates anxiety for beginners who watch tutorials made on another camera. The physics do not change. Aperture, shutter speed, ISO, white balance, metering, focus, and file format remain the core controls.
The mode dial may show M. Shutter priority may be S on some cameras and Tv on Canon. Aperture priority may be A or Av. Exposure compensation may have a plus-minus symbol. ISO may have a button, dial, quick menu, touch menu, or custom key. Sony’s support guide, for example, describes setting aperture with the front dial and shutter speed with the rear dial in a P/A/S/M video exposure setup, while Canon’s EOS R5 page describes using camera controls to set shutter speed and aperture in Manual mode.
Beginners should learn their own camera’s control path early. Find these items without looking up a tutorial every time: mode dial or mode menu, aperture control, shutter speed control, ISO control, Auto ISO on/off, exposure meter, histogram display, white balance, autofocus mode, focus area, drive mode, RAW/JPEG setting, and playback zoom. That list matters more than brand debates.
Mirrorless cameras often show exposure preview in the viewfinder. DSLRs may not show the actual exposure through the optical viewfinder, though live view and playback help. Some mirrorless cameras disable exposure preview when flash is attached or when certain settings are active. Some cameras simulate exposure only within limits. Read the manual for your model when preview behavior seems odd.
Entry cameras may have one command dial, requiring a button press to change aperture in M mode. Higher-end bodies often have two or three dials. Some lenses have aperture rings. Some compact cameras use control wheels. These differences affect speed, not concept. A beginner with one dial can still learn manual exposure perfectly.
Auto ISO behavior varies. Maximum limits, minimum shutter settings, exposure compensation in M, and menu placement differ by system. Nikon’s and Canon’s documentation show that Auto ISO can participate in manual exposure, but exact control details are camera-specific. Test your camera rather than assuming another brand’s behavior.
Terminology also varies. Evaluative, matrix, multi, and multi-segment metering are related broad-area metering concepts. Center-weighted and spot are more consistent terms. Highlight-weighted exists on some systems. Autofocus naming differs even more. Do not let vocabulary hide the function.
The beginner’s job is not to learn every brand. It is to map universal exposure ideas onto the camera in hand. Once aperture, shutter, ISO, meter, histogram, and focus controls are easy to find, brand differences become small friction rather than a wall.
A 30-minute practice plan that teaches your fingers
Manual mode becomes usable when the fingers know where the controls are. Reading helps, but the body must learn. A 30-minute practice session in steady light is enough to turn theory into muscle memory. Use a still subject, daylight near a window or open shade, and a lens you use often.
Spend five minutes finding controls without taking photos. Set M mode. Change shutter speed while watching the value. Change aperture. Change ISO. Turn Auto ISO on and off. Display the histogram in playback. Zoom into the image during playback. Change white balance. Return the camera to M mode, ISO 400, f/5.6, and 1/250 second. This part feels basic, but it removes panic.
Spend five minutes on brightness. Photograph the subject at the meter’s zero point. Then make the image one stop darker using shutter speed. Return to zero. Make it one stop brighter using ISO. Return. Make it one stop darker using aperture. Compare files. The goal is to see that different controls can change brightness while adding different side effects.
Spend five minutes on aperture. Keep the subject in the same place with a background several meters behind it. Shoot at the widest aperture, f/4, f/8, and f/11, adjusting shutter speed or ISO to keep similar brightness. Compare background blur and subject sharpness. This teaches depth of field more clearly than reading a definition.
Spend five minutes on shutter speed. Ask someone to walk through the frame or wave a hand. Shoot at 1/30, 1/125, 1/500, and 1/1000, adjusting exposure with ISO or aperture. Compare motion blur. Then photograph the still subject at 1/30 handheld and again on a stable surface. Compare camera shake.
Spend five minutes on ISO. Keep aperture and shutter fixed at values that need more brightness, then raise ISO step by step. View noise on a larger screen later. Decide your personal comfort limit for normal use.
Spend five minutes on diagnosis. Intentionally make one photo too dark, one too bright, one blurred by slow shutter, one noisy from high ISO, and one with too shallow depth. Then fix each one with the least damaging setting change. This is the strongest part of the practice because it trains problem-solving, not just setup.
End by creating two personal default settings. One for daylight walking around, such as f/5.6, 1/250, Auto ISO. One for indoor people, such as f/2.8, 1/250, Auto ISO with a maximum. Save them mentally or in custom modes if the camera supports it.
The point of practice is not to produce portfolio images. It is to remove hesitation. A beginner who can change aperture, shutter, and ISO without hunting through menus is already halfway to usable manual mode.
The mental checklist before pressing the shutter
Before pressing the shutter in M mode, run a short checklist. It should be short enough to use under pressure. Long checklists fail in real shooting. The beginner version is: subject, shutter, aperture, ISO, meter, focus, frame.
Subject means identifying what matters. Is it the face, gesture, product, skyline, bird, plate of food, or atmosphere? Without a subject priority, settings become random.
Shutter means asking whether movement will blur. Is the subject still, walking, running, flying, or flowing? Is the camera handheld or stable? Is the lens long? Choose a safe shutter speed for that reality.
Aperture means asking how much depth is needed. One face? Several people? Foreground and background? Close-up detail? Blurred background? Choose the f-number for that depth and light.
ISO means asking whether the current sensitivity is acceptable. If Auto ISO is on, know the maximum. If ISO is manual, set it deliberately. Do not discover ISO 12800 in bright daylight or ISO 100 in a dark room by accident.
Meter means checking the exposure indicator, histogram, or live preview. Is the image near the intended brightness? Is the meter being fooled? Are highlights safe? The meter is a guide, but ignoring it wastes time.
Focus means checking focus mode and focus point. Is autofocus on? Is continuous AF needed? Is eye AF choosing the right eye? Is the focus point on the subject? Is depth too shallow for the pose?
Frame means looking at edges and background. Manual exposure does not fix a pole growing from someone’s head, a cut-off hand, a tilted horizon, or a distracting bright patch. Technical control serves the composition.
This checklist becomes faster with use. At first it may take ten seconds. Later it becomes almost automatic: “moving child, 1/500, f/2.8, Auto ISO, face exposure, continuous AF, clean edge.” That is manual mode becoming practical.
For static work, the checklist slows down: “foreground to background sharp, f/8, ISO 100, tripod, histogram protected, focus one-third into scene, edges clean.” The same logic adapts to the subject.
Manual mode is not three settings. It is a sequence of decisions tied to the subject. The checklist keeps those decisions in order and prevents the common beginner habit of fixing the wrong problem first.
Manual mode after the beginner stage
Once M mode feels usable, the next step is not staying in M forever. Experienced photographers move between modes based on the job. Manual mode is excellent for controlled light, studio work, flash, scenery, night tripod shots, consistent events, panoramas, product work, video, and scenes where the meter is fooled. Aperture priority is excellent when depth matters and light changes quickly. Shutter priority suits situations where motion control matters and aperture can float. Program mode is useful for quick casual shooting. Auto mode is acceptable when the photo matters less than speed.
The mature skill is knowing which mode reduces risk. Manual mode is not more professional by default. A beginner who insists on M during rapidly changing light may miss photos that aperture priority with exposure compensation would handle better. A photographer who uses aperture priority in a studio with fixed lights may get inconsistent exposures that manual mode would solve. Mode choice is a tool choice.
Manual mode also leads naturally into flash, studio lighting, exposure bracketing, filters, and video. Flash introduces another exposure layer. Bracketing helps with high-contrast scenes. ND filters allow wide apertures or long exposures in bright light. Polarizers manage reflections and skies. Video adds frame rate, shutter cadence, and audio. Manual exposure is the foundation for all of these because it teaches what light is doing before tools complicate it.
The exposure triangle remains useful, but beginners eventually outgrow the triangle as a diagram. They start thinking in priorities and constraints. “I need 1/1000 for the bird, f/6.3 because that is my lens wide open at this focal length, and ISO will land where it lands.” “I need f/8 for depth, ISO 100 for quality, and the tripod will handle a two-second shutter.” “I need f/2.8 for the room, 1/125 for the speaker, and ISO 3200 is acceptable.” That is real manual thinking.
A deeper understanding of light also matters. Direction, size, contrast, color, and distance of light shape the image before settings record it. A window portrait in soft side light at ISO 800 may look far better than a harsh overhead-lit portrait at ISO 100. Exposure settings cannot make bad light beautiful by themselves. Move the subject, change angle, wait for light, diffuse, reflect, or add light.
Editing becomes part of the workflow but should not become a crutch. Good manual exposure gives editing stronger files. Protect highlights, avoid unnecessary blur, keep ISO within reason, and shoot RAW when the image matters. Editing then refines tone and color instead of rescuing preventable mistakes.
The real value of M mode is not control for its own sake. It is predictability. The photographer knows why the image looks the way it looks and knows what to change next. That confidence carries into every other mode and every camera.
A practical step-by-step manual mode recipe
A beginner needs a recipe that works on a real camera, not only an explanation. Use this sequence for still photography. It assumes a typical mirrorless or DSLR camera with aperture, shutter speed, ISO, meter, autofocus, and histogram.
Set the camera to M. Turn on RAW or RAW+JPEG if available. Turn on the histogram display in playback, and live histogram if the camera supports it. Set metering to evaluative, matrix, or multi. Set autofocus to single AF for still subjects or continuous AF for moving subjects. Set white balance to Auto for changing light or a fixed preset/Kelvin value for consistent light.
Decide whether ISO should be manual or Auto. For learning, use manual ISO. For real moments in changing light, Auto ISO is often safer. If using Auto ISO, set a maximum. Do not leave the ceiling unknown.
Choose shutter speed based on motion. For a still subject handheld, start around 1/125 or faster with normal lenses. For moving people, start 1/250. For children and pets, start 1/500. For sports, start 1/1000. For tripod scenes, choose shutter later.
Choose aperture based on depth. For one portrait, start f/2.8 to f/4. For groups, f/5.6 to f/8. For scenery, f/8 to f/11. For low light with one subject, use the widest aperture that still gives enough focus depth.
Adjust ISO or shutter speed until the meter is near the intended exposure. If ISO is manual and the image is too dark, raise ISO after deciding shutter and aperture cannot move safely. If the image is too bright, lower ISO, speed up the shutter, or stop down. If Auto ISO is on, check what ISO the camera selected and whether it is acceptable.
Take a test shot. Check the histogram, not only the screen. Check highlights. Zoom in on the subject to confirm focus and blur. If the image is too dark or bright, change one exposure setting. If the subject is blurred, raise shutter speed. If the background is too distracting, open aperture or change position. If not enough is sharp, stop down. If noise is too high, add light, stabilize, use slower shutter for still subjects, or accept the noise.
Shoot the real sequence. Recheck when light changes, when subject speed changes, when moving indoors or outdoors, when switching lenses, or when the result suddenly looks wrong.
This recipe is deliberately plain. Manual mode becomes simple when every setting has a reason and every correction responds to one visible problem. The beginner does not need to think like a camera engineer. The beginner needs to ask better questions in the right order.
Manual mode myths that slow beginners down
The first myth is that professionals always shoot manual. They do not. Professionals use the mode that protects the job. A photojournalist may use aperture priority with exposure compensation while moving through changing light. A studio photographer may use manual because the light is controlled. A sports photographer may use manual shutter and aperture with Auto ISO. A wedding photographer may switch modes all day. Professionalism is not the letter on the dial; it is the ability to get the result.
The second myth is that ISO should always stay at 100. Low ISO gives cleaner files, but a blurred subject is rarely saved by cleanliness. B&H’s ISO guide makes the practical point that base ISO gives strong image quality when light allows it, but higher ISO is necessary when aperture and shutter speed cannot meet the shot. Use low ISO when possible, not when destructive.
The third myth is that wide aperture is always better. Wide aperture gives light and blur, but it also reduces depth. A group at f/1.8 may fail. A product at f/1.4 may show only a thin slice. A face at f/1.2 may miss the eye. Aperture should fit the subject, not ego.
The fourth myth is that the meter must always be at zero. The meter target is based on what the camera thinks should happen. Snow, black clothing, night scenes, stages, windows, and silhouettes may need exposure away from zero. The histogram and subject matter matter more than blind obedience.
The fifth myth is that expensive cameras remove the need to learn exposure. Better cameras offer more dynamic range, cleaner high ISO, smarter autofocus, and better previews. They do not change the relationship between light, time, aperture, and sensitivity. A high-end camera can still blur a moving subject at 1/30 second. It can still clip highlights. It can still focus on the wrong object.
The sixth myth is that manual mode is too slow. It is slow while learning. Once practiced, it can be faster than automation in steady light because the exposure stays fixed. The slow part is indecision, not manual mode itself.
The seventh myth is that one cheat sheet solves everything. Starting settings are useful, but the scene decides. A cheat sheet cannot know whether the child is running, whether the room has window light, whether the background matters, whether the camera is stabilized, or whether the image is for a billboard or a family chat. Use starting points, then read the result.
Manual mode myths survive because they sound clean. Real photography is conditional. The beginner who accepts trade-offs learns faster than the beginner searching for universal settings.
The deeper business value of knowing manual settings
Manual mode is not only for hobby improvement. It has business value for creators, small brands, marketers, ecommerce teams, real estate agents, educators, restaurants, service businesses, and anyone producing visual content without a full production crew. Better exposure means fewer reshoots, more consistent assets, and images that match across a campaign or website.
Product photos need consistency. If the camera is in Auto, a white product on a white background, a black product on the same background, and a reflective product may all receive different exposure decisions. Manual mode lets the team set exposure once for the lighting and keep the batch consistent. That saves editing time and improves catalog trust.
Food photography needs color and texture. A slow shutter may blur handheld shots. Wrong white balance may make food look stale or artificial. High ISO may damage detail. Manual exposure with controlled light gives repeatable results. A restaurant does not need a cinema crew for every social post, but someone should know why the pasta looks orange under warm bulbs.
Real estate interiors often include bright windows and darker rooms. Automatic exposure may shift wildly from frame to frame. Manual mode, histogram review, bracketing, and careful white balance give more consistent files. Even when HDR or editing is used, the capture choices matter.
Personal branding and social content benefit from repeatability. A coach, designer, maker, or consultant photographing themselves near the same window can lock manual exposure and white balance, then create a consistent set over time. The images feel intentional because brightness and color do not drift.
Video content raises the stakes. Automatic exposure changes during a talking-head clip look distracting. Manual video settings keep the face, background, and color stable. Sony’s support pages show that manual aperture, shutter speed, and ISO control in movie modes may require choosing the correct exposure control mode, which is exactly the kind of operational detail creators need to confirm before recording.
For agencies and content teams, manual exposure knowledge improves briefs. Instead of saying “make it brighter,” a director can say “protect the window highlights,” “keep the product label sharp,” “freeze the hand movement,” or “use more depth for the group.” Better language creates better work.
Manual camera knowledge is a production control skill. It reduces dependence on luck, lowers editing friction, and makes visual output repeatable. For beginners, that may sound far away. In practice, it begins with the same three controls: aperture, shutter speed, and ISO.
The easiest manual settings to remember
Beginners need memorable anchors. These are not universal settings. They are safe starting points that make the next adjustment easier.
For outdoor portraits in soft light, start at f/2.8 or f/4, 1/250 second, ISO 100 to 400. For direct sun, ISO may stay low and shutter speed may need to rise. Watch highlights on skin and clothing.
For indoor people, start at f/2.8, 1/250 second, Auto ISO or ISO 1600 to 6400 depending on light. If people are still, 1/125 may work. If they move, 1/500 may be needed. Noise is safer than blur.
For scenery handheld, start at f/8, 1/250 second, ISO adjusted to meter. For tripod scenery, use ISO 100, f/8 or f/11, and whatever shutter speed the histogram needs.
For sports and pets outside, start at 1/1000 second, widest practical aperture, Auto ISO. If motion still blurs, go faster. If ISO is too high, accept noise or find better light.
For night streets handheld, start with the widest aperture, 1/125 to 1/250 for people, Auto ISO, and watch highlights. For static night scenes, use a tripod, ISO 100, f/8, and a long shutter.
For product or food near a window, use a tripod if possible, ISO 100 or 200, f/5.6 to f/8 for depth, and shutter speed as needed. Set white balance and keep it consistent.
These anchors work because they start with the likely failure. Portraits need depth and face sharpness. Indoor people need shutter speed. Scenery needs depth and highlight control. Sports need speed. Night scenes need stabilization or ISO. Product work needs consistency.
After taking a test shot, adjust deliberately. Too dark? Add exposure through the least harmful control. Too bright? Remove exposure. Blurry? Faster shutter or better stabilization. Too little depth? Stop down. Too noisy? Add light, stabilize, or decide whether noise is acceptable.
A starting setting is not a promise. It is a place to begin looking. Manual mode becomes easy when the photographer expects to adjust after the first frame.
Manual mode as a way to see light
The hidden gift of manual mode is that it teaches light awareness. In Auto, the camera often hides how much the scene changed. In M mode, the meter moves, the histogram shifts, ISO climbs, shutter speed runs out, and aperture limits become obvious. The photographer begins to notice that shade is not merely darker than sun; it is softer and cooler. Window light falls off with distance. Backlight needs different exposure judgment than front light. A cloudy day gives easier portraits than harsh noon sun. A white wall can act like a reflector. A black ceiling eats bounce flash.
This awareness changes behavior. Instead of forcing settings in bad light, the photographer moves the subject. Instead of raising ISO endlessly in a dim corner, they walk closer to a window. Instead of shooting a portrait under green office light, they turn the subject toward daylight. Instead of trying to expose a person against a blown-out window, they change angle or add fill.
Manual mode also teaches the value of consistency. If the light on a subject stays the same, the exposure can stay the same even if the background changes. That is a powerful idea. Photograph a person in steady shade against bright walls, dark trees, and open sky; automatic modes may shift exposure as the background changes. Manual mode keeps the face consistent. The photographer sees that subject light matters more than background tone for exposure.
The inverse is also true. If the subject moves from shade to sun, manual exposure must change even if the framing looks similar. The light on the subject changed. The camera cannot solve that if all settings are fixed. This teaches when manual mode needs adjustment and when Auto ISO or priority modes may be safer.
Reading light is more valuable than memorizing settings. Settings are answers to light. Without seeing the light, the numbers are guesses. A beginner who learns that open shade allows flattering portraits, that backlight needs face exposure, and that side light reveals texture will make better images even with imperfect numbers.
Manual exposure is a training tool for the eye. It makes the cost of light visible. It teaches that photography is not mainly about camera menus; it is about deciding what light should do to the subject.
Manual mode and creative intent
Once exposure basics are stable, manual mode becomes expressive. The same scene can be photographed many ways. A fountain at 1/1000 second freezes droplets. At 1/4 second, water turns silky. A portrait at f/1.8 isolates a face. At f/8, the environment becomes part of the story. A night street exposed brightly looks commercial; exposed darker, it feels cinematic and real. These choices are not right or wrong. They are intent.
Manual mode is useful because it keeps intent from being overwritten. If the photographer wants a dark silhouette, automatic exposure may brighten it. If the photographer wants blur, automatic exposure may raise shutter speed. If the photographer wants shallow depth in bright sun, the camera may close aperture unless another setting or ND filter is used. M mode lets the photographer hold the chosen look.
Creative intent still needs technical respect. A silhouette needs highlight exposure and strong shape. Motion blur needs at least one stable reference or a convincing pan. Shallow depth needs accurate focus. High ISO grit may suit documentary work but not product detail. Dark exposure may feel moody or merely underexposed depending on subject and tonal placement.
Beginners should try creative pairs. Photograph the same moving subject frozen and blurred. Photograph the same person with shallow and deep depth. Photograph the same night scene bright and dark. Photograph the same room with Auto white balance and a fixed warm Kelvin value. The comparison teaches visual language.
Manual mode also supports series work. If a project needs consistent mood, lock the exposure and color. A set of portraits in the same room, a food series for a menu, or a product batch for a website benefits from repeatable settings. Consistency makes the creative choice feel intentional.
Do not confuse manual mode with over-control. Some images benefit from looseness. Street work may allow imperfect exposure if the moment is strong. Family photos may value expression over clean ISO. Documentary work may accept mixed light because it is truthful. Manual settings should serve the image, not suffocate it.
Creative manual exposure means choosing the side effect you want and controlling the ones you do not. Blur, depth, noise, darkness, brightness, and color are all part of the language once they are deliberate.
The calm path from Auto to M
A beginner does not need to jump from Auto to full manual overnight. A smoother path builds one control at a time. Start with Program mode and watch what the camera chooses. Move to aperture priority to learn depth of field. Move to shutter priority to learn motion. Then use M mode in steady light. This path teaches each setting before all three need attention.
Aperture priority is useful for portraits, detail work, and scenery because the photographer chooses depth while the camera chooses shutter speed. Watch the shutter speed carefully. If it falls too low, raise ISO or open aperture. Shutter priority is useful for sports, pets, and motion experiments because the photographer chooses speed while the camera chooses aperture. Watch whether the aperture hits its limit; if it does, raise ISO.
Manual mode becomes less frightening after priority modes because the beginner has seen each control’s effect. The final step is simply taking responsibility for the remaining variable. Adobe’s exposure guide describes Auto, aperture priority, shutter priority, and Manual as exposure modes with different levels of control, which matches this learning path.
Another route is M mode with Auto ISO. This lets the beginner control aperture and shutter speed while the camera handles brightness. It is less pure for learning exposure but very practical. Once aperture and shutter become comfortable, turn Auto ISO off during practice and learn the full triangle.
Use custom modes if the camera has them. Save a daylight walking setup, an indoor people setup, and a tripod setup. This lowers the fear of getting lost. If settings become chaotic, return to the saved mode.
Reset habits matter. Many bad manual experiences happen because the camera remains at last night’s settings. ISO 6400, 1/30 second, f/1.8 may be fine indoors at night and terrible outdoors at noon. Build a shutdown habit: after shooting, return to a safe default such as f/5.6, 1/250, Auto ISO or ISO 400, daylight or Auto white balance, normal metering, autofocus on. The next session starts from sanity.
Learning should be seasonal and subject-based. Spend one week on aperture with portraits or objects. Spend one week on shutter speed with moving subjects. Spend one week on ISO indoors. Spend one week on histograms. Manual mode is not learned in one article; it is learned through repeated feedback.
The calm path to M mode is gradual control, not sudden perfection. Each mode can teach part of the system. Manual mode becomes the place where those lessons meet.
Practical limits beginners should accept
Every camera has limits. Every lens has limits. Every scene has limits. Manual mode does not remove them. Accepting this is freeing because it stops the search for impossible settings.
A dark room with moving people needs light, high ISO, wide aperture, or blur. A cheap slow zoom cannot behave like a fast prime in the same light. A tiny sensor may show noise sooner than a larger sensor. A long telephoto magnifies shake. A close-up scene has shallow depth. A bright sky and dark foreground may exceed the camera’s dynamic range. A mixed-light room may never have perfect color everywhere.
Dynamic range is a major limit. It is the span between shadows and highlights the camera can record with detail. If the scene exceeds it, some tones must clip, block, or be blended through lighting, filters, bracketing, or editing. Manual exposure chooses where the detail is preserved. It cannot store infinite information.
Lens maximum aperture is another limit. If the lens only opens to f/5.6 at the long end, no setting changes it to f/2.8. ISO and shutter speed must compensate. Lens minimum aperture also limits long exposures in bright light, which is why ND filters exist.
Shutter speed limits matter too. Cameras have maximum shutter speeds and flash sync limits. Electronic shutters may offer very fast speeds but with rolling-shutter issues under certain motion or lighting. Mechanical shutters have physical limits. Bulb mode handles long exposures but needs stability and power.
Autofocus limits often appear in low light and low contrast. Manual exposure may be perfect while focus hunts. Add contrast, use a focus assist light if appropriate, switch focus area, use manual focus, or focus on an edge at the same distance.
Human limits matter. Handholding at slow speeds varies by person. Some photographers are steady at 1/30. Others need 1/125. Fatigue, cold, caffeine, long lenses, and posture all affect sharpness. Test your own limit rather than copying someone else’s.
Manual mode is powerful because it reveals limits honestly. A beginner who understands the limit can solve it: add light, change position, use a tripod, accept noise, pick a different moment, or choose a different look. The camera is not failing when physics says no.
A final working model for beginners
By now, M mode should feel less like three mysterious numbers and more like a working model. Aperture controls light and depth. Shutter speed controls light and time. ISO controls brightness and noise. The meter suggests. The histogram reports. White balance controls color. Focus controls sharpness. The subject decides priority.
A beginner can carry one compact thought into every manual-mode situation: choose the setting that prevents failure first, choose the setting that creates the look second, then balance brightness with the remaining control. That thought works for portraits, sports, scenery, products, indoor family photos, night scenes, and video. It is flexible because the first setting changes with the subject.
For a portrait, failure may be missed focus or ugly depth, so aperture and focus matter early. For action, failure is blur, so shutter speed matters early. For scenery, failure is insufficient depth or clipped highlights, so aperture and histogram matter early. For indoor events, failure is often blur and color drift, so shutter speed, ISO, and white balance matter early. For video, failure is inconsistent motion and brightness, so shutter cadence and fixed exposure matter early.
Manual mode rewards patience, but it also rewards honesty. If the test frame is wrong, the file is not insulting you. It is reporting the result of the settings. Read it. Change one decision. Try again. That loop is the whole craft at the beginner stage.
The goal is not to shoot everything manually forever. The goal is to understand the camera well enough that every mode becomes a choice. After learning M mode, aperture priority makes more sense. Shutter priority makes more sense. Auto ISO makes more sense. Flash makes more sense. Editing makes more sense. Even a phone camera makes more sense because the same principles are hiding beneath its computational choices.
Manual mode is learned one decision at a time. Set the camera to M in steady light. Make a frame. Read the meter and histogram. Notice blur, depth, noise, color, and focus. Change one thing. Repeat until the camera stops feeling like a guessing machine and starts feeling like an instrument.
Manual camera settings questions beginners ask next
M means manual exposure. You choose shutter speed and aperture, and depending on ISO settings, you may also choose ISO manually or let Auto ISO adjust brightness.
No. Manual exposure and manual focus are separate. Your camera can use autofocus while the exposure mode is set to M.
Change the setting tied to the biggest risk. Use shutter speed first for movement, aperture first for depth of field, and ISO last when brightness needs help.
For daylight practice, try ISO 100 or 200, f/5.6, and 1/250 second. Adjust from there using the meter and histogram.
For one person in soft light, start around f/2.8 to f/4, 1/250 second, and ISO adjusted to the light. Use a narrower aperture for groups.
For posed people, 1/125 or 1/250 often works. For children, pets, and active people, start around 1/500. For sports, start around 1/1000.
The camera is not receiving enough exposure for the result you want. Open the aperture, slow the shutter if safe, raise ISO, add light, or change position.
Blur usually comes from slow shutter speed, camera shake, subject movement, missed focus, or too little depth of field. Check shutter speed and focus first.
No. ISO 100 is clean when light allows it, but higher ISO is often needed to keep shutter speed fast enough or aperture narrow enough.
Yes, when used knowingly. It lets you lock shutter speed and aperture while the camera adjusts ISO. Set a maximum ISO so quality does not surprise you.
A low f-number such as f/1.8, f/2.8, or f/4 gives more background blur, especially when the subject is close and the background is farther away.
For scenery or groups, f/8 to f/11 is a common starting range. Focus placement, distance, lens choice, and sensor size still matter.
The meter aims for its brightness target, not your intent. Bright snow, dark clothing, backlight, and stage lighting can fool it.
Yes. The histogram shows where shadows, midtones, and highlights landed. It is more reliable than judging exposure only from the rear screen.
Auto white balance is fine for changing light. Use a preset, Kelvin value, or custom white balance when color consistency matters.
RAW is useful because it gives more editing room for exposure and white balance. RAW does not fix motion blur, missed focus, or badly clipped highlights.
Manual mode is better when exposure consistency matters or the meter is fooled. Aperture priority is often faster when light changes and depth of field is the main concern.
The camera likely used high ISO because the light was low. Add light, use a wider aperture, stabilize for still subjects, or accept some noise to avoid blur.
No. Manual mode works on many entry cameras. Better gear may offer cleaner ISO, faster lenses, and better controls, but the exposure principles are the same.
Practice in steady daylight with one still subject. Change only one setting at a time, check the histogram, and compare how aperture, shutter speed, and ISO change the image.
Author:
Jan Bielik
CEO & Founder of Webiano Digital & Marketing Agency
This article is an original analysis supported by the sources cited below
EOS R5 M manual exposure
Canon support documentation explaining Manual exposure behavior, exposure level indication, and ISO Auto exposure compensation on the EOS R5.
Understanding Auto ISO
Nikon’s explanation of Auto ISO behavior across exposure modes, including Manual mode with fixed aperture and shutter speed.
Manually set the shutter speed, aperture, and ISO sensitivity when shooting a movie
Sony support guidance for setting aperture, shutter speed, and ISO sensitivity in video exposure control modes.
Manual Exposure ILCE-9 help guide
Sony help guide page describing Manual Exposure as direct adjustment of aperture and shutter speed.
How to manually adjust the aperture and shutter speed when recording movies
Sony support article explaining that movie mode exposure must be set correctly before manual aperture and shutter speed control is available.
Exposure triangle basics
Canon Australia’s beginner guide to ISO, aperture, shutter speed, and how they combine to control exposure.
Depth of field
Canon UK’s reference article explaining aperture, distance, focal length, and practical depth-of-field behavior.
White balance definition and settings
Canon Europe’s guide to white balance, color temperature, and the need to correct color under tricky lighting.
Using your camera’s histograms
Canon’s histogram guide explaining luminance and RGB histograms as exposure assessment tools.
The beginner’s guide to white balance
Nikon magazine article explaining white balance, Kelvin values, common presets, and RAW editing relevance.
Camera metering modes explained
Nikon guide covering matrix, centre-weighted, spot, and highlight-weighted metering modes.
Understanding exposure part 1 the exposure triangle
B&H Explora reference explaining aperture, shutter speed, and ISO as the core exposure controls.
Exposure 101 an intro to exposure
B&H beginner article covering exposure, stops, aperture, shutter speed, ISO, and practical balancing.
Exposure 101 intro to aperture
B&H guide explaining aperture, lens speed, depth of field, and aperture’s role in exposure.
Exposure 101 intro to shutter speed
B&H guide explaining shutter values, motion rendering, camera shake, and shutter speed in the exposure system.
Exposure 101 intro to ISO
B&H article explaining ISO, noise, base ISO, and the practical need to raise ISO when light is limited.
How to use manual mode camera settings like a pro
Adobe guide introducing manual-mode use of ISO and shutter speed for brightness and creative effect.
How to use camera exposure settings
Adobe reference explaining exposure, aperture, shutter speed, ISO, and common exposure modes.
Basic DSLR settings to improve your photography
Adobe beginner guide covering manual mode, exposure settings, and histogram review in DSLR photography.
Camera exposure aperture ISO and shutter speed
Cambridge in Colour tutorial explaining the exposure triangle, stops, aperture, shutter speed, ISO, and exposure modes.
Understanding camera metering and exposure
Cambridge in Colour article explaining reflected-light metering, middle gray assumptions, and metering-mode behavior.
Understanding depth of field in photography
Cambridge in Colour tutorial covering depth of field and how aperture, distance, and focal length affect apparent sharpness.
Understanding digital camera histograms
Cambridge in Colour reference on histogram interpretation for tones, contrast, highlights, and shadows.
Understanding white balance
Cambridge in Colour tutorial explaining white balance, color temperature, and lighting color correction.
Using camera shutter speed creatively
Cambridge in Colour guide on using shutter speed to freeze or blur motion for creative photographic results.
| Citing this article? Brief excerpts are welcome. Please credit Webiano.digital, name the author where stated, and include a link to https://webiano.digital and to this original article. Full or substantial republication requires prior written permission. Read our Copyright and Content Use Policy. |
This article was prepared with the assistance of artificial intelligence tools. The content underwent expert human review, and Webiano Digital & Marketing Agency assumes editorial responsibility for its final version and publication.